
UX Design - ACG Merch Platform
UX Design - ACG Merch Platform
UX Design - ACG Merch Platform
May 12, 2023

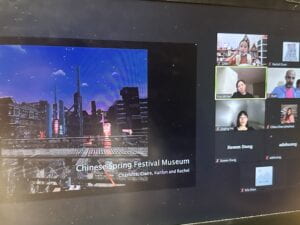
VR Experience - Chinese Spring Festival Museum
VR Experience - Chinese Spring Festival Museum
VR Experience - Chinese Spring Festival Museum
December 19, 2022
I. Final Presentation
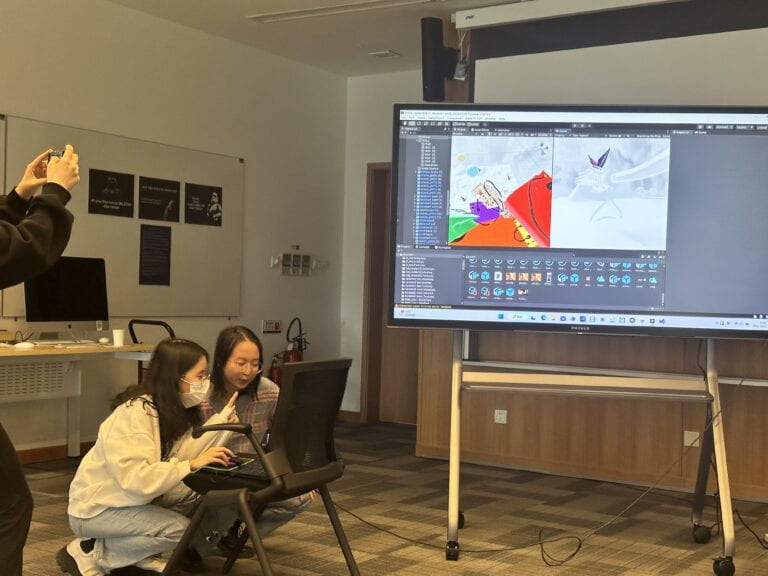
II. Presentation Pictures
(Because I was presenting during the show, so I didn’t take too much pictures)

III. Technical Process and Conceptual Approach
During the working process, our group changed the idea a lot. After we decide on the “Spring Festival” topic, we first plan to create an interactive movie to compare the original and nowadays festival. However, after one day’s working and we found that it is too hard for us to learn how to control a character in unity, which should be a big part of the movie. In this case, we quickly changed our idea to create an online museum.
The museum is designed to be separated into four rooms, and each of us shoulders one room’s decoration. My room is the Firework room and I also shouldered the responsibility to create the opening and the initial museum room.
a. The Fireworks Room
The basic idea of these fireworks is to let the player create fireworks on their own, to create some festival atmosphere in the silent city.
At first, I researched the particle system, trying to create the firework effect on my own. However, Kaitlyn helped me to find a brilliant firework model on Taobao, and I used them at last. The model we bought has a total of twenty fireworks prefabs, and I chose eight of them to let the users click on and play. For this part, I used the UI system, that is creating the canvas and bottom, and replaced the bottom with the fireworks pictures. The pictures are the screenshot of the prefabs preview, and to make it fitter with the VR environment, I also used photoshop to make the pictures more stereoscopic. At last, to make it more convenient for the users to operate, I linked the canvas with the VR camera, so that it can move with the user’s sight.

Although it is a small detail, to make the city more feel like a festival environment, I changed all the light colors in this model into a warmer colors. Before there were lots of blue and white lights, and I changed them all into red and yellow. If there were more times, I would like to make more festival decorations on it.
As for the UI system, it is here that I learned how to create canvases and buttons and make it can interact in the VR world. It also creates the foundation for me to make other interactions between different rooms. Here is the video that I learn on: UI Using Unity XR Interaction Toolkit | How to Make a User Interface That Works in VR
b. The Opening
Although the opening scene is very short, it is still a very important part of our project, for it introduced the basic background of our project. I create a modern city first to represent nowaday’s city, and when the camera is moving, there is also audio saying that “This year’s Spring Festival is still boring”, and “I wish I can hear fireworks and eat dumplings with families together” and so on, showing the background that there is not a lot of festival atmosphere nowadays. When the camera zoom in, we can see a red room with the title “Spring Festival Museum”, letting the players know that we create this museum to show we yearn for the previous festival atmosphere.
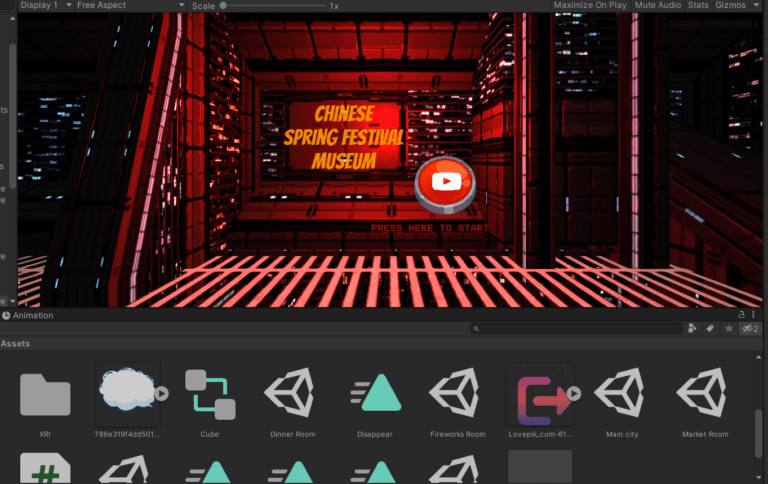
Still a small detail, but I also create long posters and add them to the original city model, so that we can have a feeling: this city is also celebrating the festival, but doesn’t have any festival atmosphere. Also, I didn’t change the light color in this model, also trying to show the comparison that there is no festival atmosphere except the posters.

Also, the animation of the camera that makes it fly above the city to the museum feels really different in the VR world, it gives us an immersive feeling of flying above the city, which is pretty cool and fun.
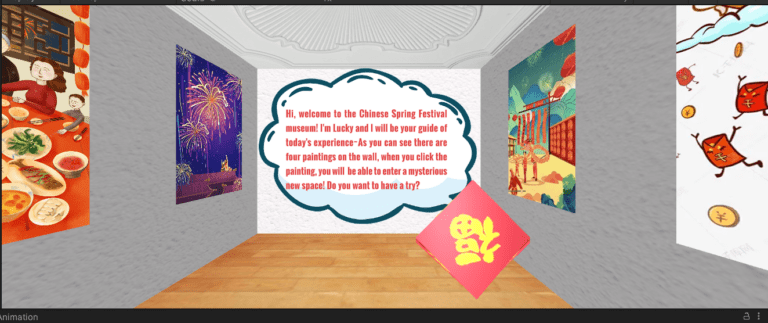
c. The Museum Room
This is a really simple setup with four posters representing our exhibition room. For this room, I create a simple room set up with materials and lights, making it just the same as an ordinary museum room in the real world. However, this is also a special point we want to show in this project, which is the unique point of the VR museum. In the real world, the museum is made up of various rooms with different showpieces. However, in the VR museum, the museum room is only one small room, but you can explore different things by clicking on it. And without letting the audience go into another room, the space is totally different after the audience chooses the showpiece, which is another interesting point we think of in our project.
To keep our rooms in one style, we also choose similar-style posters, and if there are more times, we would like to add beautiful and same-style names to our rooms.
Also, here is the scene where I learn how to change the scene with the buttons, which is also helpful for me to add the “exit” button in the exhibition rooms. Here’s the link that I reference:
https://blog.csdn.net/dislike_carry/article/details/126800139, https://blog.csdn.net/alayeshi/article/details/40344907
d. Link Four Rooms
As the one who has the best computer in this group, I also shouldered the responsibility to link each other’s rooms into a complete project. Not to say the debug project, I also pay a lot of attention to making the scenes into one similar style. The first is to unify the subtitles that everyone made. I changed the UI text into the UI textmeshpro, so that the words can be seen clearly, and I also unified the front that we use. Also, since the subtitle we create is actually the words that our Fu director speaking of, I choose the dialog box picture to be the background of the words, trying to spread the meaning of there is a director leading the audience to look around.
Also, although not knowing why there are bugs with everyone’s VR settings, I copy and paste my VR camera into everyone’s scene to solve the problem, also linked the Fu director with every scene’s camera, and add the exit bottom to every room. It’s not a complex process, but do cost me time to build the scene four times to check if there is anything else that hasn’t been unified.
IV. About our team
First, I would like to thank everyone in our group, that everyone is supportive from the beginning to the end. Although we changed ideas a lot, no one complain about the wasted work, and always started to work on the next idea energetically. Without encouragement from the group member, I cannot complete such a big and hard project.
Kaitlyn is the person who shared the second most workload. She created the Fu director with the soft effect, and also create all of the audio effects for the Fu director. She worked on the room which is called The Dinner Room, with lots of dishes that can create dialogue that the audience clicks on it. During the working process, we two spend time in 503 and spend nights in the academic building for two nights.
Claire and Charlotte both work on their own rooms separately and hand in the rooms on time, so that I can have time to link them together. Claire works on the room called The Decoration Room, and Charlotte works on the room called The Red Package Room. These two are also filled with the festival atmosphere and fulfilled our project successfully.
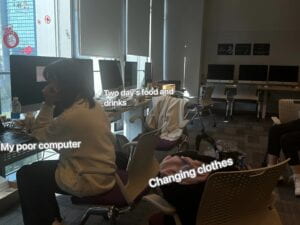
The night before the presentation, we four all leave in the 503 to complete the very last work and slept in the academic building together. When morning come and we realize that the class is going to begin, we joked that it is our home and that is going to treat guests, for the scene is really like we made a field trip in 503, with food and changing clothes. No matter how difficult the process is, we complete the hard tasks successfully. Although there is still a lot of space for us to improve, I’m still very proud of what we made as our first unity project. Thank you all and special thanks to Prof. Yunmi! Hope next time I can do better and create a better project.
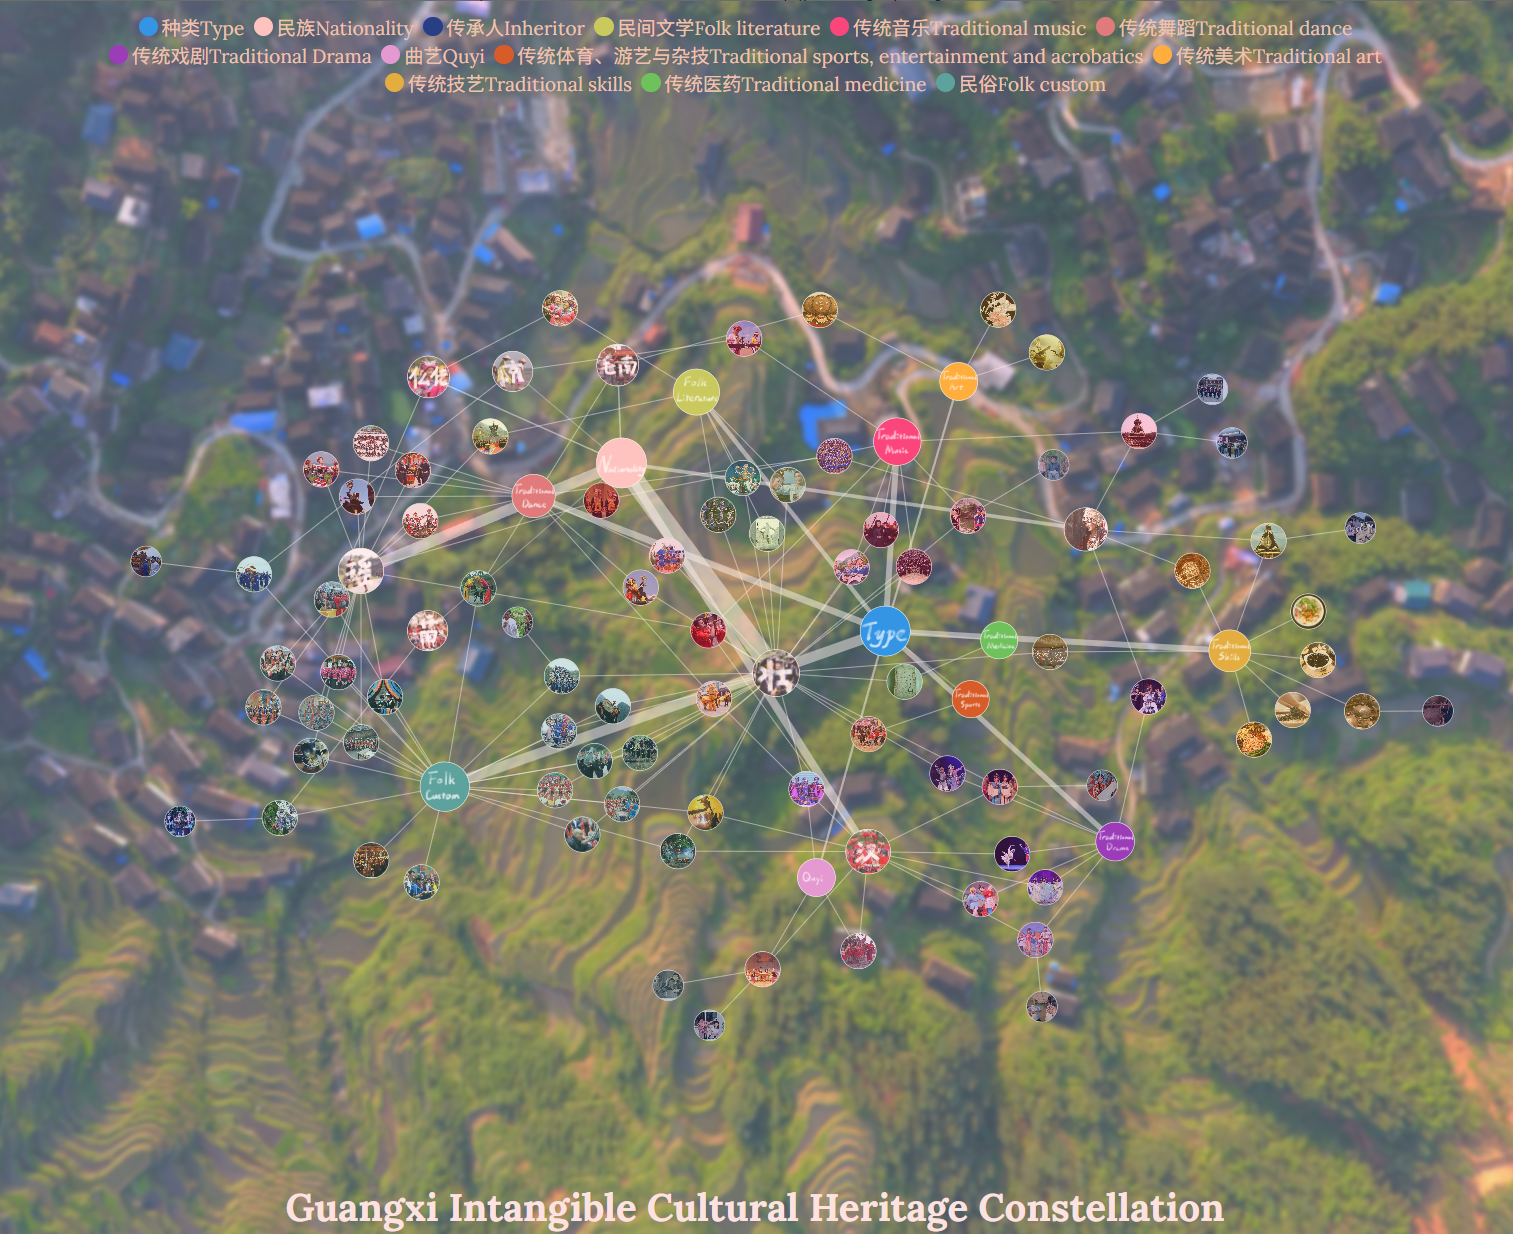
Data Visualization - Interactive Heritage Map
Data Visualization - Interactive Heritage Map
Data Visualization - Interactive Heritage Map
March 14, 2023

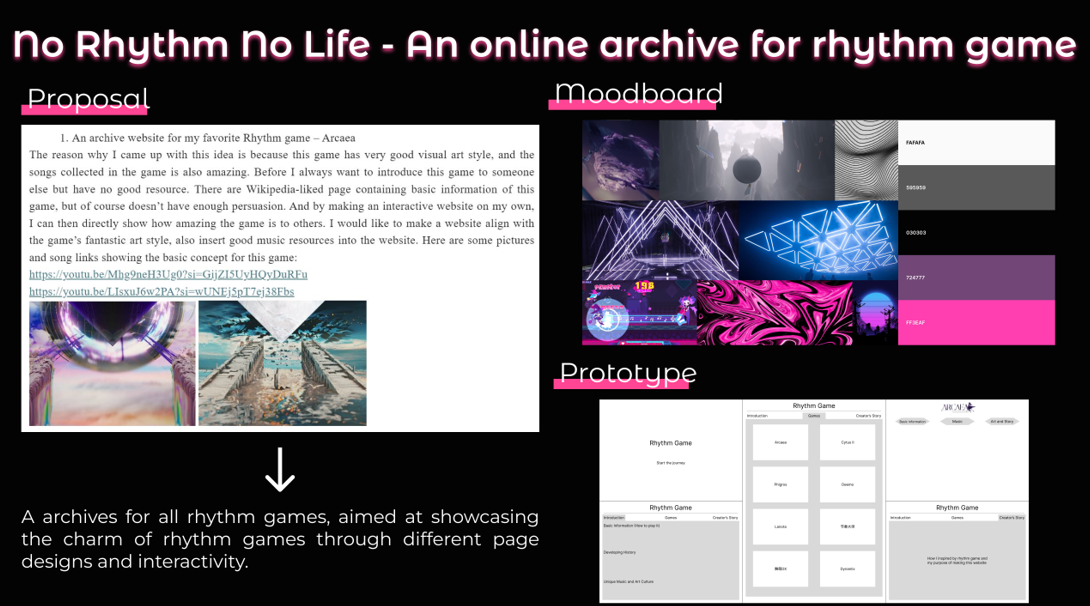
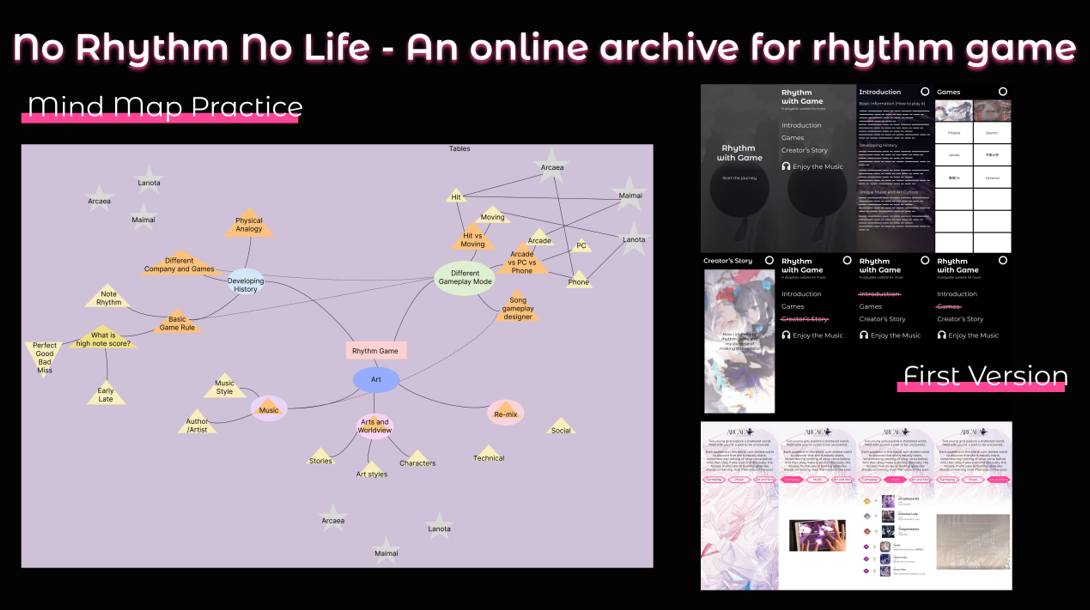
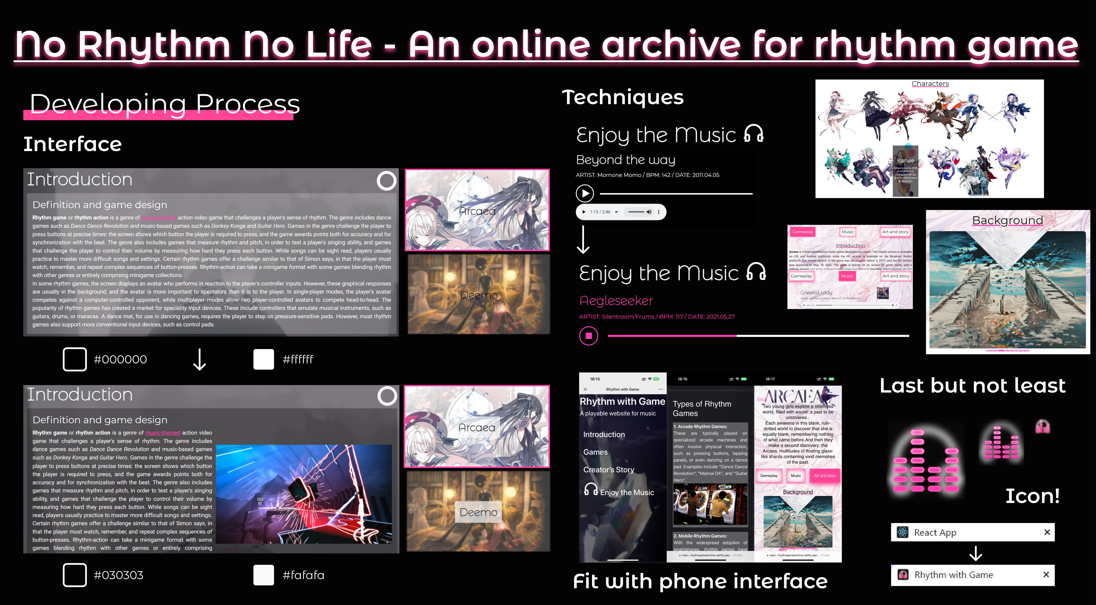
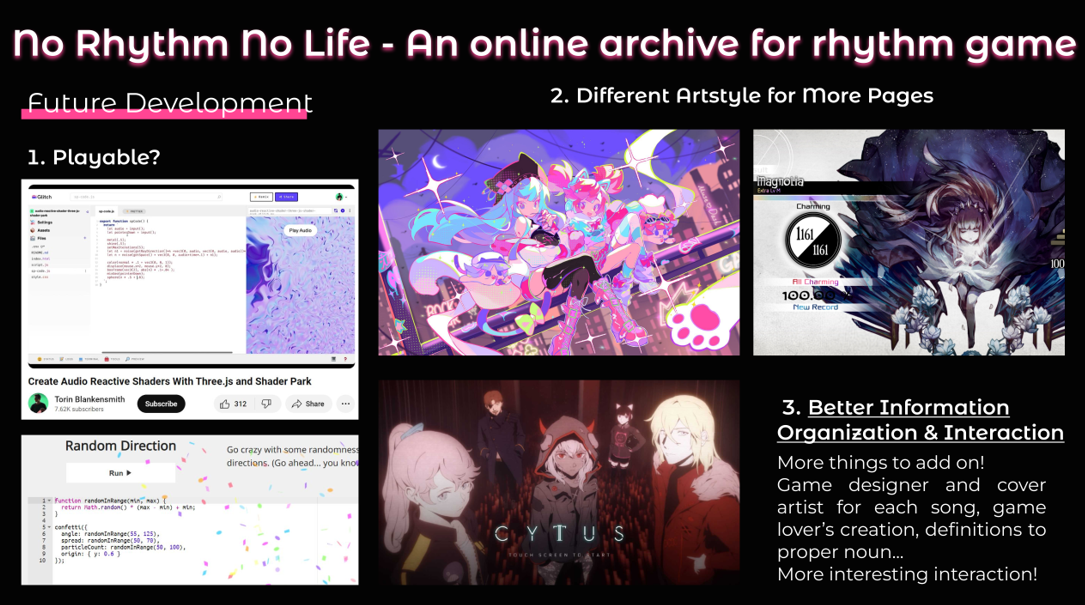
Web Design - No Rhythm No Life
Web Design - No Rhythm No Life
Web Design - No Rhythm No Life
May 8, 2024


.png)
Game - In Hell Exhale
Game - In Hell Exhale
Game - In Hell Exhale
May 7, 2023
Video:
Documentation:


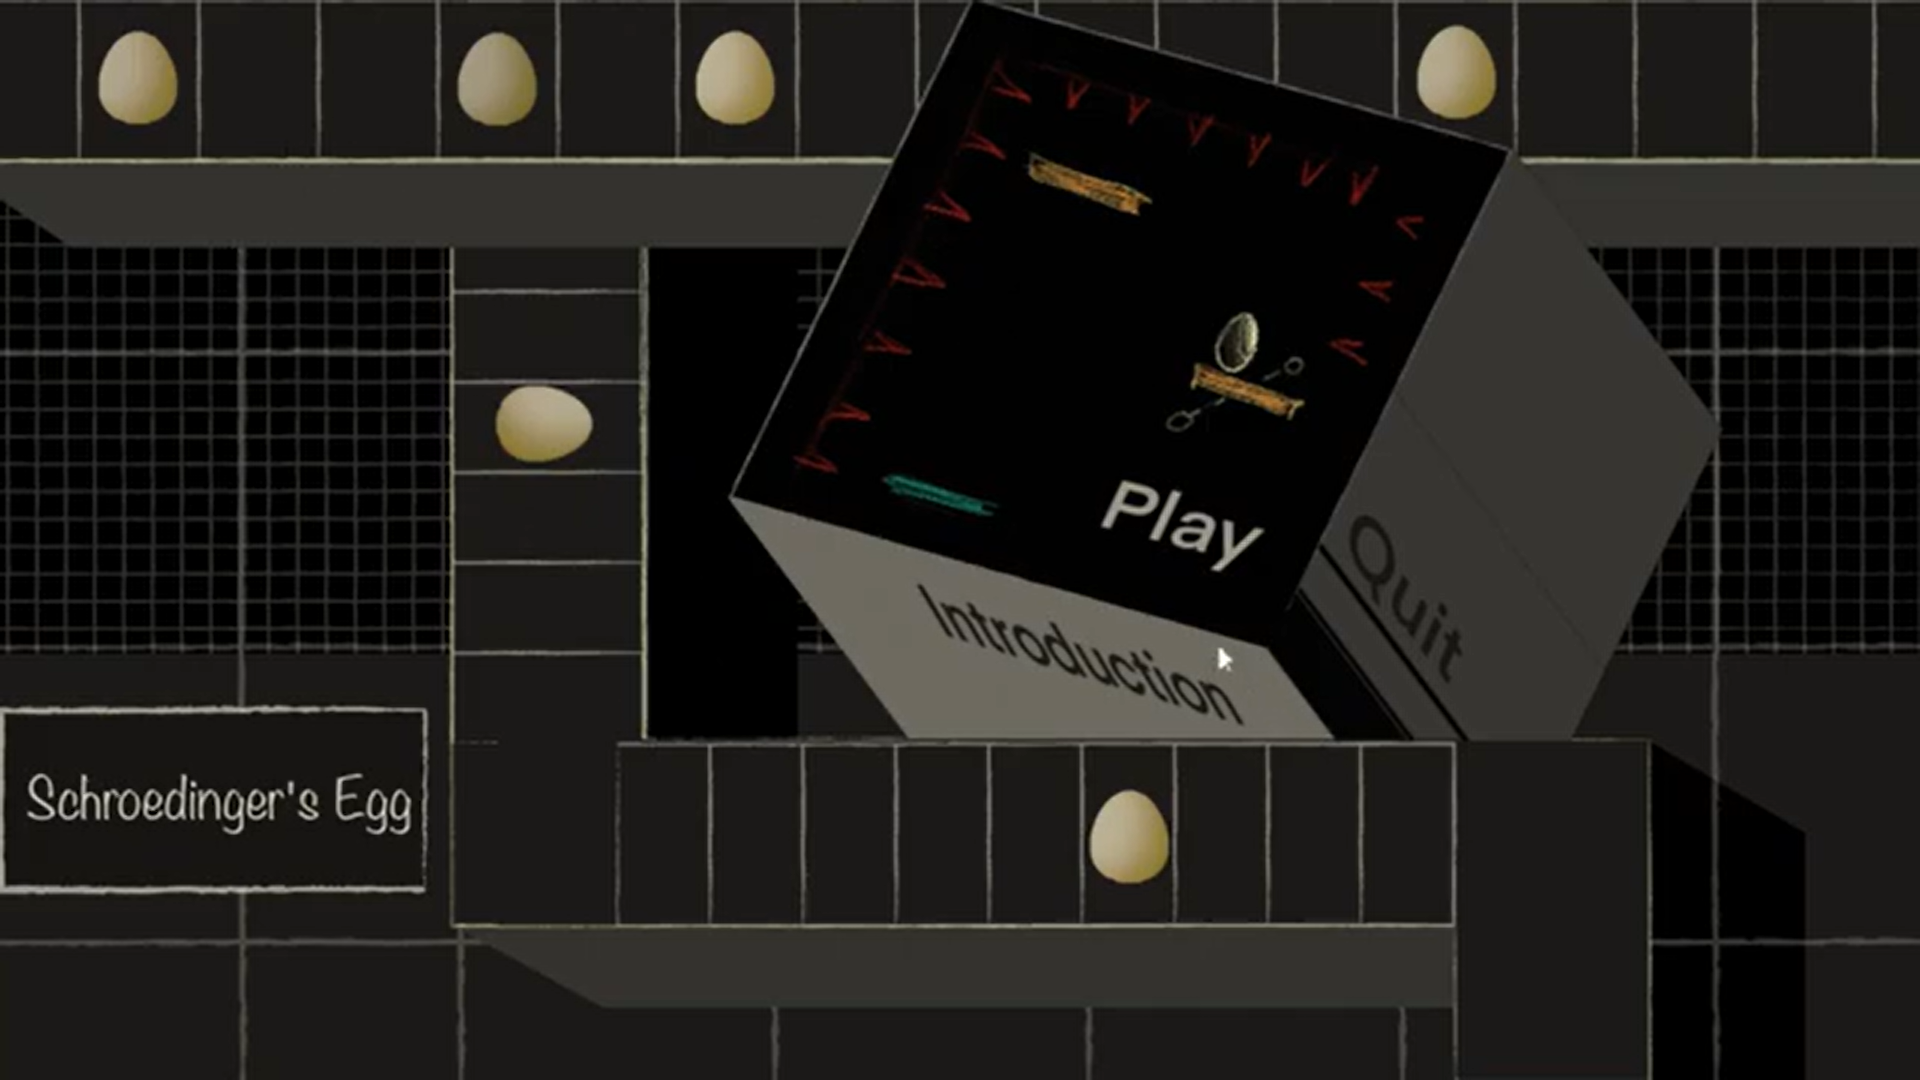
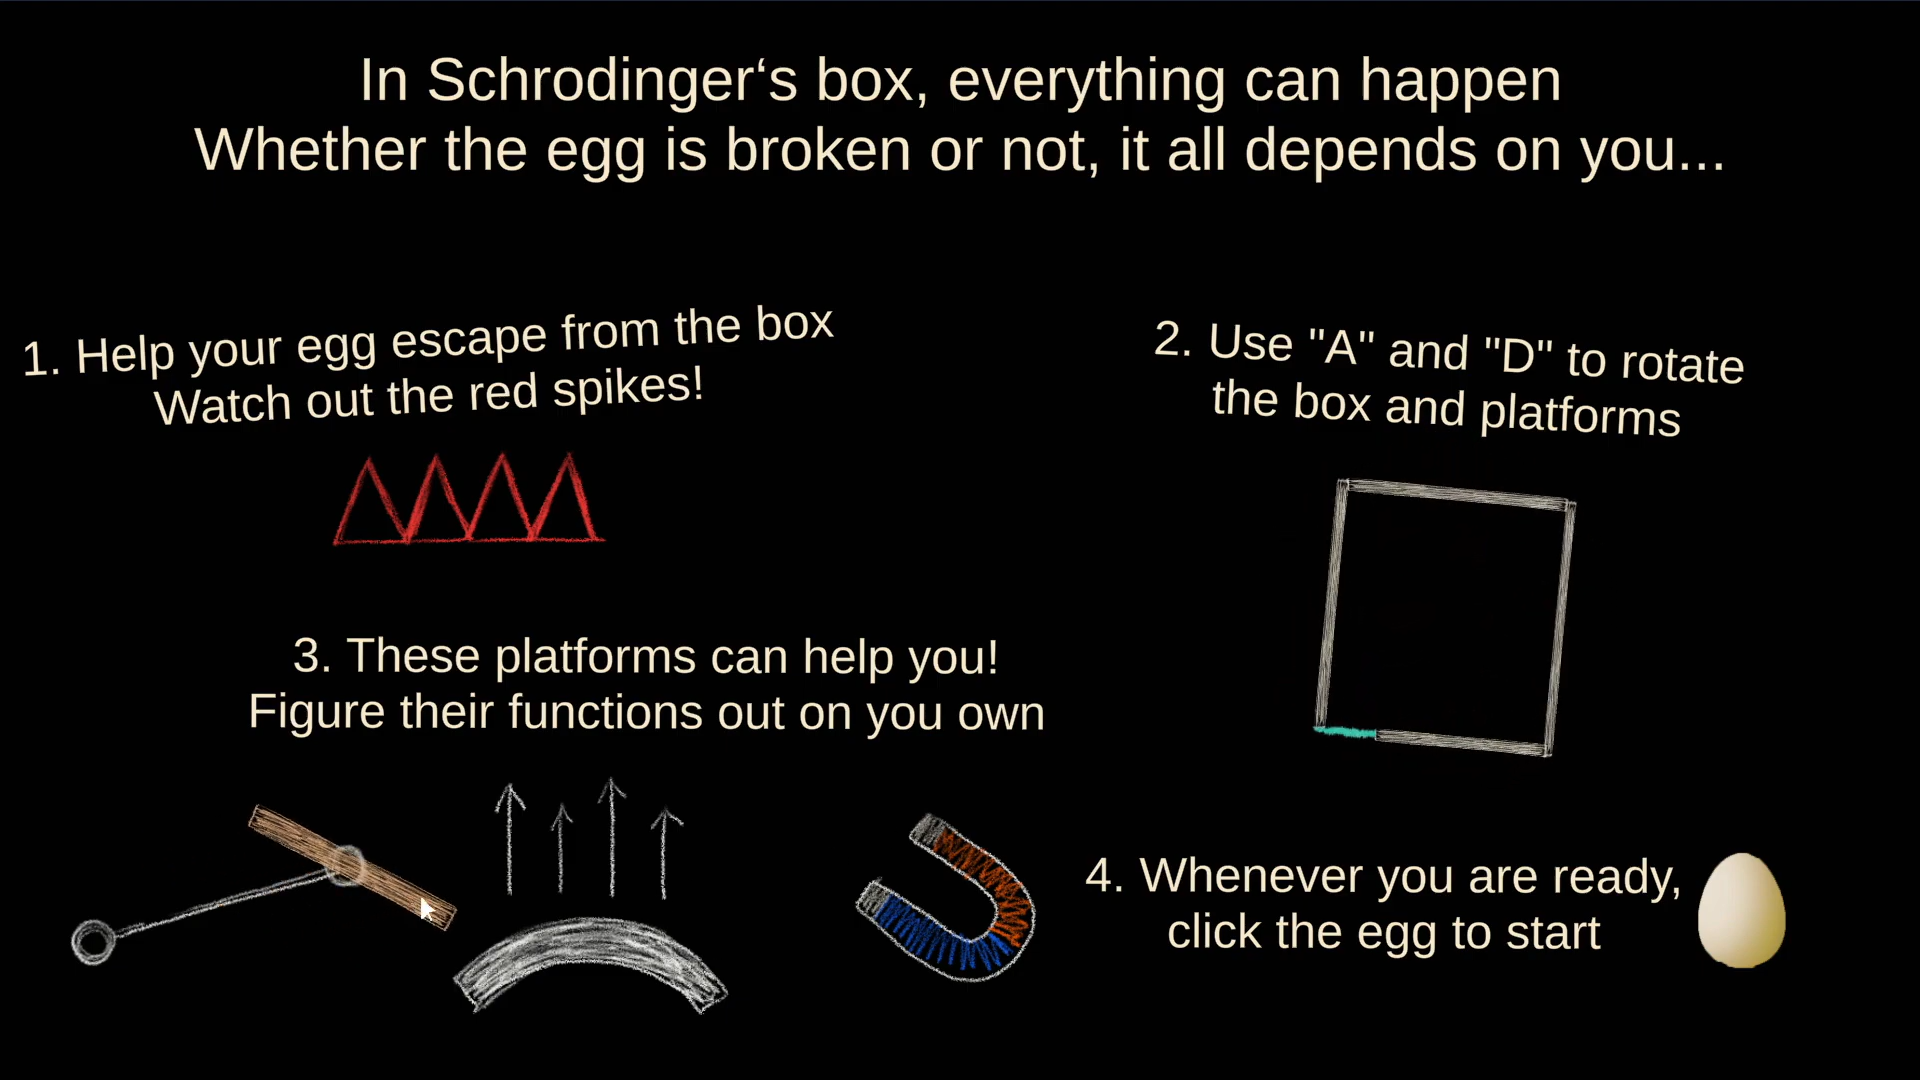
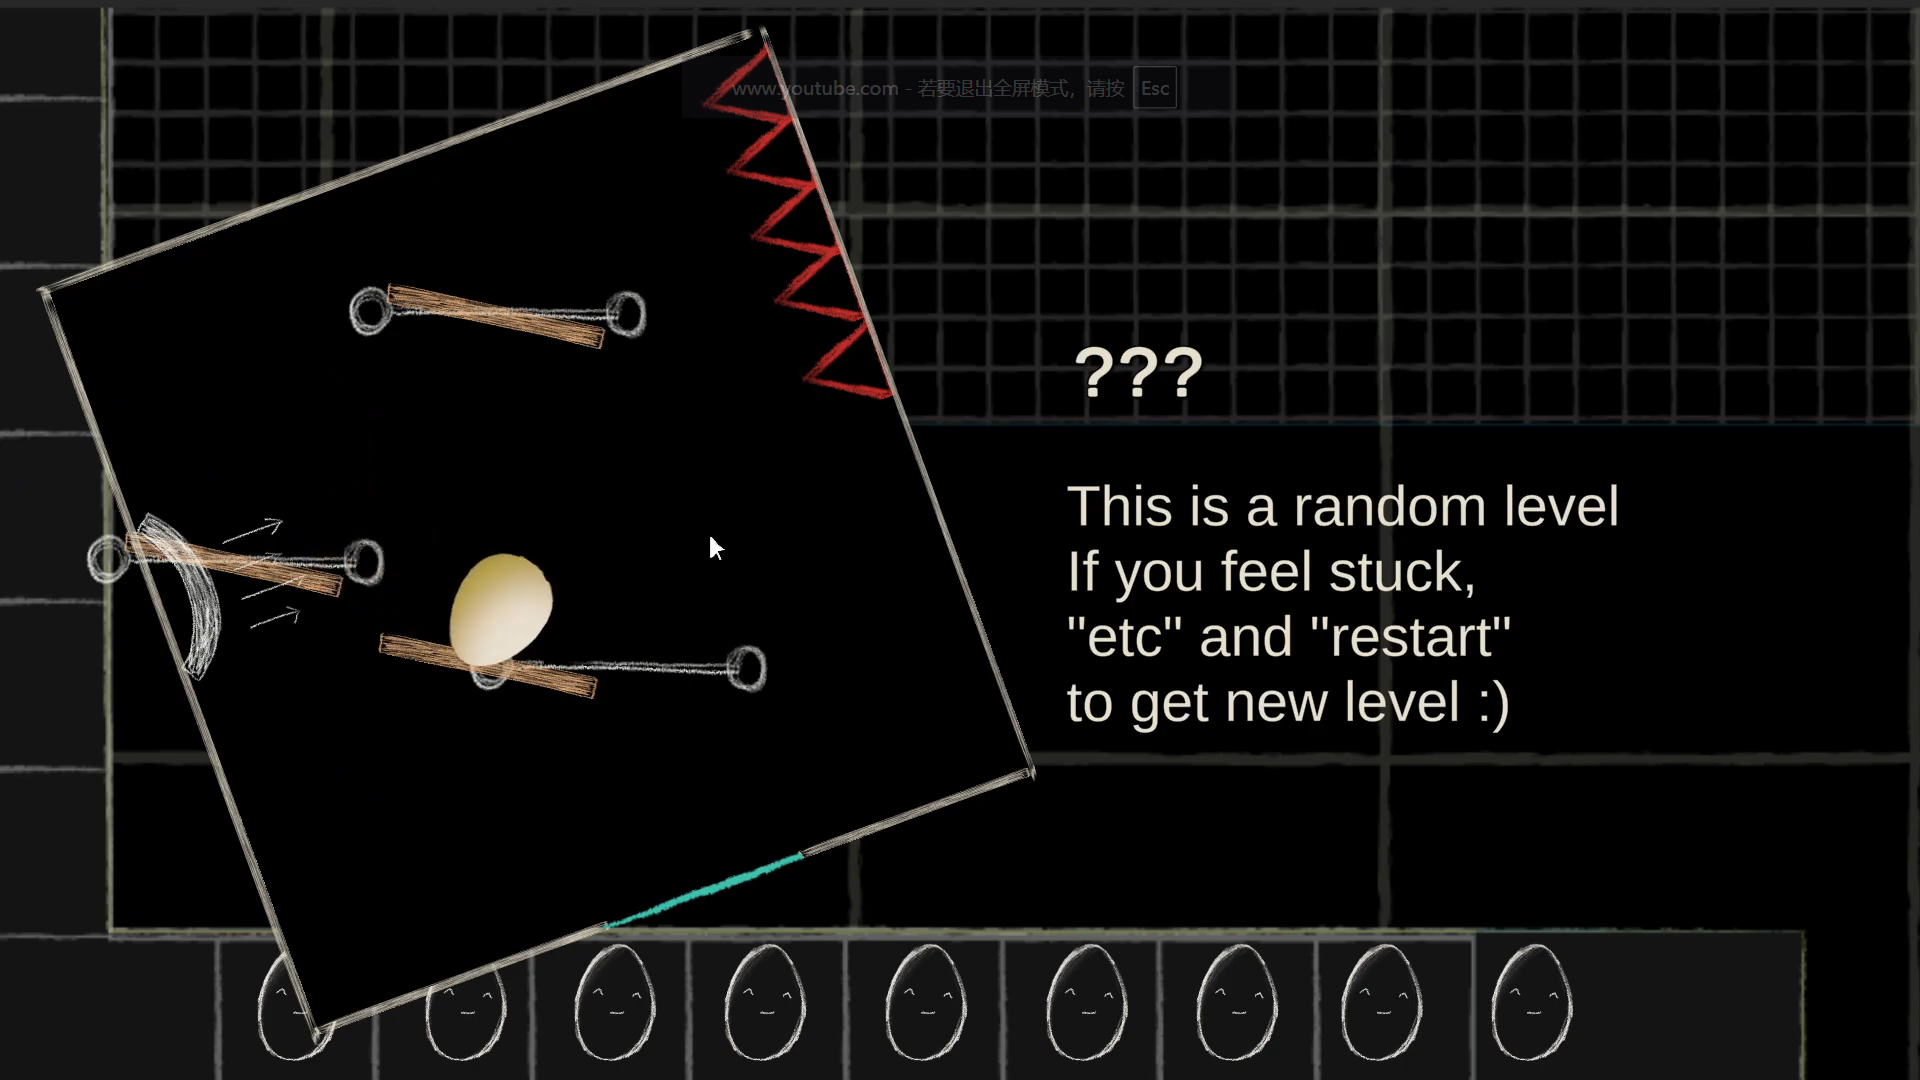
Game - Schroedinger's Egg
Game - Schroedinger's Egg
Game - Schroedinger's Egg
March 13, 2023
Video:
Download the game and have fun! (Windows)
https://drive.google.com/file/d/1V8fwdsXzqnkECrd3AMZNR4-TLDO9auwe/view?usp=sharing
Screenshots:

Documentation
- Flow chart of your game system

- Describing the structure of your game level, including challenges (could be without art)
The part I responsible for is the teaching part. I create 4 levels to lead the player to get familiar with our 4 functions: The rotatable outside box, the rotatable slicing platform, the bouncing platform, and the gravity platform. The challenge is find the only way out by adjusting the angle of the platforms. It need times to explore and restart to find the most proper way.
- Video recording of progress of your game

Product - White Cane
Product - White Cane
Product - White Cane
October 24, 2021
Introduction Videos:
I. CONTEXT AND SIGNIFICANCE
As this is our first individual project, in the beginning, we decided to use the sensors we had already studied to complete our project. During the research, we asked a sophomore what she had designed for the midterm project, and her answer was a machine to read the color for blind people. It was the time when we came up with an idea–using the ultrasonic rangers and buzzers to make a prompting-distance blind stick for blind people.
We thought it was different from the normal one because when there are some obstructions get closer, the blind stick will make a sound to remind people. The usual blind sticks are used in the way of holding it to touch if there is something ahead, and what we did was using the machines to measure the distances. We hope this stick can help blind people to learn about the road conditions more ahead of time and thus avoid being tripped over. We thought our project may be more useful than the normal one for blind people.
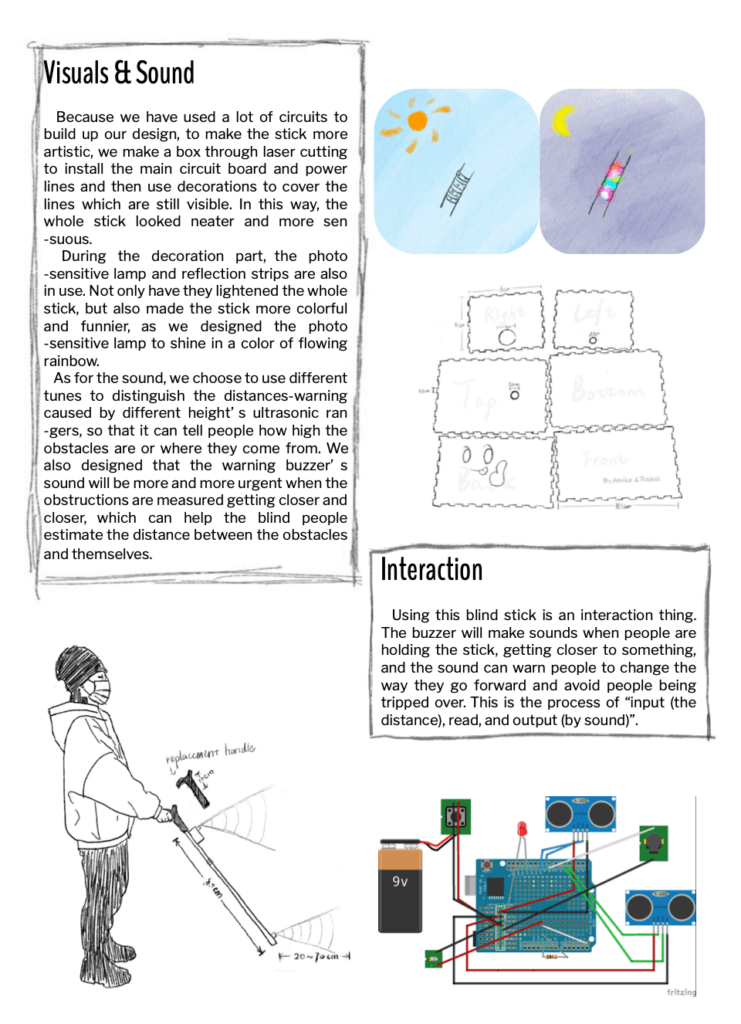
After the first user-testing part, we also added some elements to make the blind stick more practical. It was equipped with a photosensitive lamp, which will automatically turn on when the day gets darker, and some light reflection strip that will light up when a beam of light turns to it. Both are used to remind normal people, that someone is walking ahead so that the people can consciously make way for them.
Because it is a more useful staff rather than a thing for fun, we thought using this blind stick is an interaction thing. The buzzer will make sounds when people are holding the stick, getting closer to something, and the sound can warn people to change the way they go forward and avoid people being tripped over. This is the process of “input (the distance), read, and output (by sound)”.
II.CONCEPTION AND DESIGN
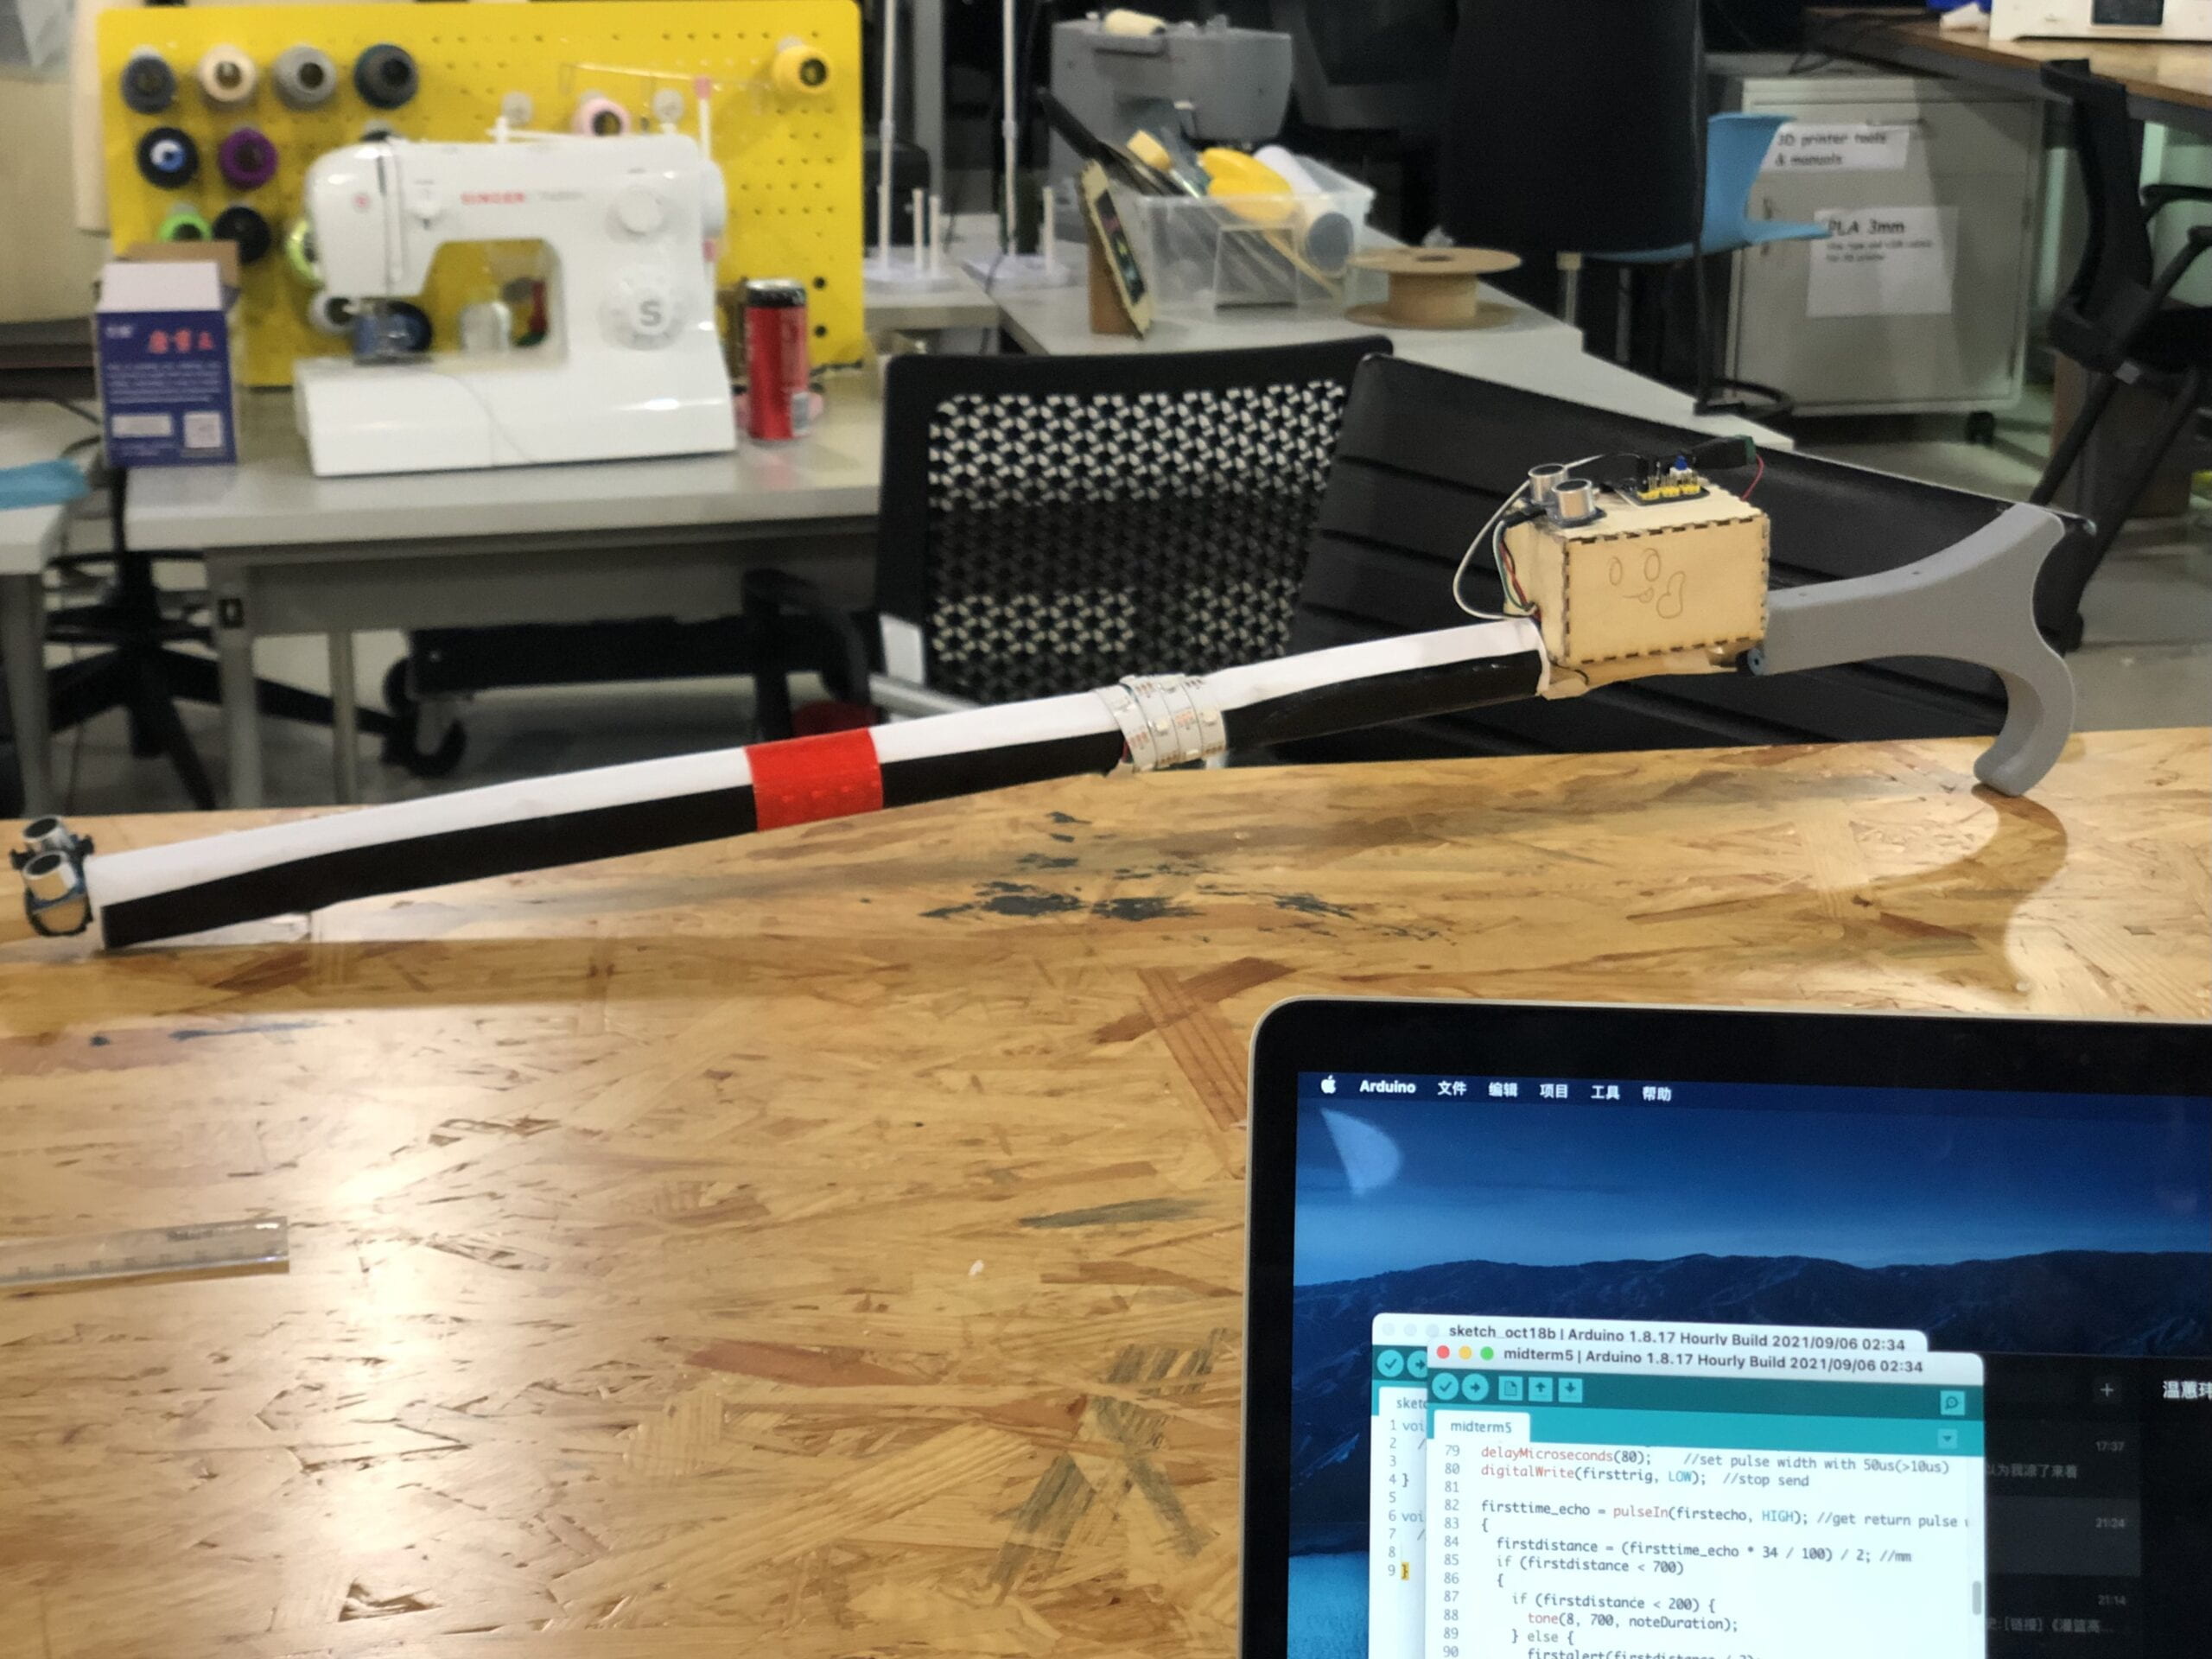
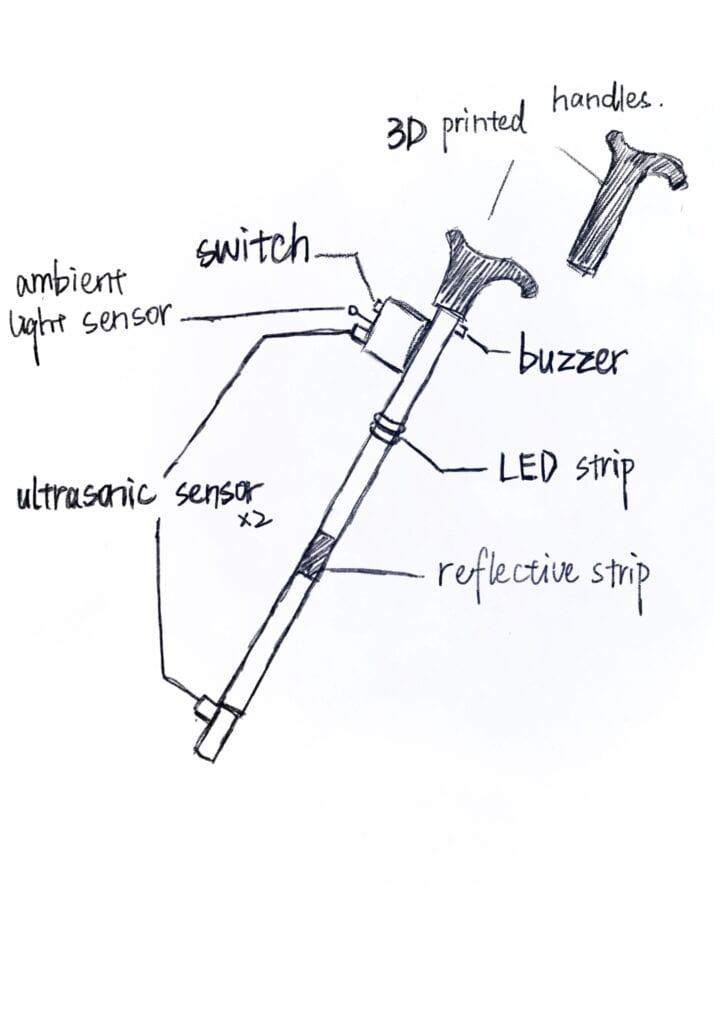
The stick consists of four parts: the detachable handle, a switch with charger battery, the distance measuring devices with the sound-warning buzzer, and the stick with brightening parts. The other three parts are all be installed on the stick part, which is the body of our project.
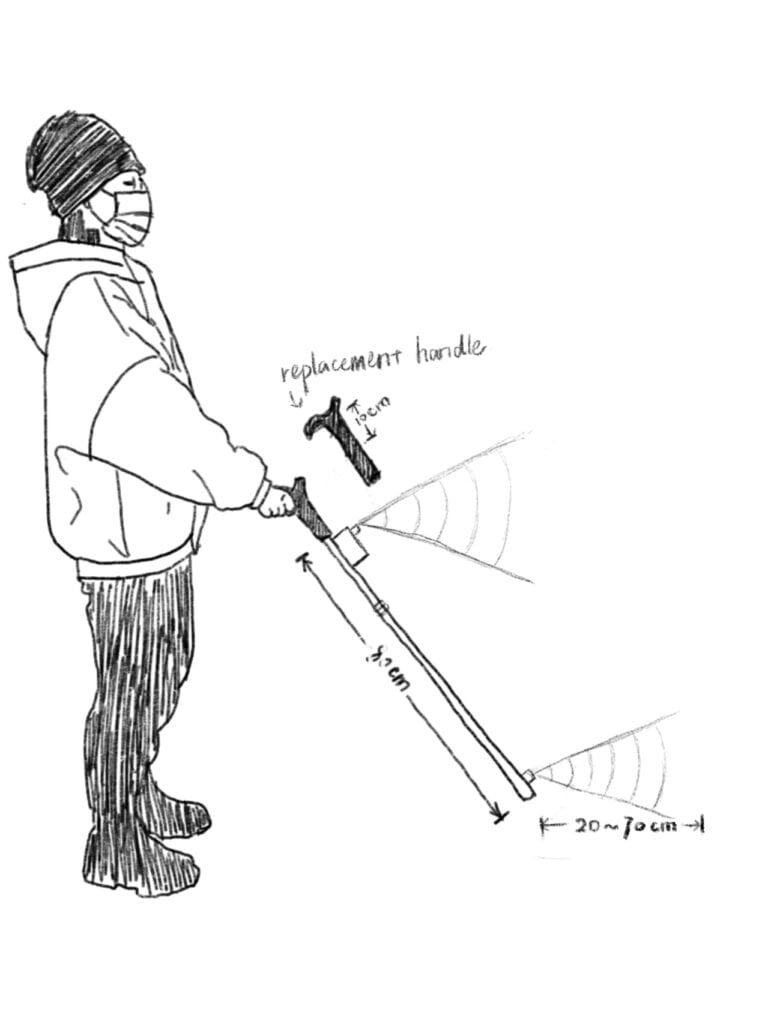
At first, we tried to make the telescopic pole to adjust the length of the stick so that it could fit with people of different heights. However, the 3D printer could not be made a telescopic pole that could slide, so we changed the idea into making the handle in different lengths. These detachable handles can be easily assembled to the stick so that people with different heights can adjust the stick into the one which is suitable for them. The handle is designed in some waves, which is more convenient for people to hold and use it. The battery and switch are installed just below the handle so that people can easily switch on and off this equipment due to their needs.
The measuring devices include two ultrasonic rangers, one on the mid-upper and one on the bottom, which is designed to measure the obstructions in a larger range. The ultrasonic rangers are linked with the buzzer so that when the distance they measured is close and get in a safety-distance range, the buzzer will make a sound to warn. To make it more convenient to use, we designed different tunes to distinguish the distances-warning caused by different height’s ultrasonic rangers, so that it can tell people how high the obstacles are or where they come from. We also designed that the warning buzzer’s sound will be more and more urgent when the obstructions are measured getting closer and closer, which can help the blind people estimate the distance between the obstacles and themselves. Because of the element’s low equality, the buzzer’s sound is some-kind small, so it is installed on the top of the stick in purpose to get closer to people’s ears and be easier to hear.
The photosensitive lamp and light reflection strips are equipped on the middle, which is the most visible part of the stick and can fully meet our needs of reminding others. This part is also very useful during the decoration part. Not only have they lightened the whole stick, but also made the stick more colorful and funnier, as we designed the photosensitive lamp to shine in a color of flowing rainbow.
At last, to make the stick more artistic, we make a box through laser cutting to install the main circuit board and power lines and then use decorations to cover the lines which are still visible. In this way, the whole stick looked neater and more sensuous.
III. FABRICATION AND PRODUCTION
The circuit:

The design drawing:
The poster:

The code:
#include <FastLED.h>

int beeppin = 8;
int noteDuration = 100;

//for the LED
int LED = 13;
int val = 0;
#define AD5 A5

//for the forward
int firstecho = 10;
int firsttrig = 9;
unsigned long firsttime_echo = 0; // record the pulse width by sensor returns
unsigned long firstdistance = 0; // record the distance value;

//for the ground
const int secondtrig = 4;
const int secondecho = 5;
unsigned long secondtime_echo = 0;
unsigned long seconddistance = 0;

//For the LED
#define LED_PIN     13
#define LED_TYPE    WS2811
#define COLOR_ORDER GRB
#define NUM_LEDS    15
CRGB leds[NUM_LEDS];
#define BRIGHTNESS   64

#define UPDATES_PER_SECOND 100

CRGBPalette16 currentPalette;
TBlendType    currentBlending;

extern CRGBPalette16 myRedWhiteBluePalette;
extern const TProgmemPalette16 myRedWhiteBluePalette_p PROGMEM;

void setup() {
  Serial.begin(9600);
  pinMode(beeppin, OUTPUT);
  pinMode(LED, OUTPUT);

  delay( 3000 ); // power-up safety delay
  FastLED.addLeds<LED_TYPE, LED_PIN, COLOR_ORDER>(leds, NUM_LEDS).setCorrection( TypicalLEDStrip );
  FastLED.setBrightness(  BRIGHTNESS );

  currentPalette = RainbowColors_p;
  currentBlending = LINEARBLEND;

  //for the forward
  pinMode(firstecho, INPUT);
  pinMode(firsttrig, OUTPUT);

  //for the ground
  pinMode(secondtrig, OUTPUT); // Sets the trigPin as an Output
  pinMode(secondecho, INPUT); // Sets the echoPin as an Input

}

void firstalert(unsigned i) {
  tone(8, 700, noteDuration);
  delay(i);
  noTone(8);
  delay(i);
}

void secondalert(unsigned i) {
  tone(8, 600, noteDuration);
  delay(i);
  noTone(8);
  delay(i);
}

void loop() {

  //for the forward
  digitalWrite(firsttrig, HIGH); //send pulse
  delayMicroseconds(80);    //set pulse width with 50us(>10us)
  digitalWrite(firsttrig, LOW);  //stop send

  firsttime_echo = pulseIn(firstecho, HIGH); //get return pulse width
  {
    firstdistance = (firsttime_echo * 34 / 100) / 2; //mm
    if (firstdistance < 700)
    {
      if (firstdistance < 200) {
        tone(8, 700, noteDuration);
      } else {
        firstalert(firstdistance / 2);
      }
    }
    Serial.print("forwardDistance: ");
    Serial.println(firstdistance);
    delay(10);
  };


  //for the ground
  digitalWrite(secondtrig, HIGH); //send pulse
  delayMicroseconds(80);    //set pulse width with 50us(>10us)
  digitalWrite(secondtrig, LOW);  //stop send

  secondtime_echo = pulseIn(secondecho, HIGH); //get return pulse width
  {
    seconddistance = (secondtime_echo * 34 / 100) / 2; //mm
    if (seconddistance < 700)
    {
      if (seconddistance < 200) {
        tone(8, 600, noteDuration);
      } else {
        secondalert(seconddistance / 2);
      }
    }
    Serial.print("groundDistance: ");
    Serial.println(seconddistance);
    delay (10);
  };


  //for the LED
  val = analogRead(AD5);         // 读取电压值0~1023
  Serial.print("the light is:");
  Serial.println(val);         // 串口查看电压值的变化
  Serial.println('\n');
  delay(10);

  if (val < 800) {            // 一旦小于设定的值,LED灯关闭
    fadeToBlackBy( leds, NUM_LEDS, NUM_LEDS);
    FastLED.show();
    delay(0);

  } else {                       // 否则LED亮起
    ChangePalettePeriodically();

    static uint8_t startIndex = 0;
    startIndex = startIndex + 1; /* motion speed */

    FillLEDsFromPaletteColors( startIndex);

    FastLED.show();
    FastLED.delay(1000 / UPDATES_PER_SECOND);
  }
}

void FillLEDsFromPaletteColors( uint8_t colorIndex)
{
  uint8_t brightness = 255;

  for ( int i = 0; i < NUM_LEDS; ++i) {
    leds[i] = ColorFromPalette( currentPalette, colorIndex, brightness, currentBlending);
    colorIndex += 3;
  }
}


void ChangePalettePeriodically()
{
  uint8_t secondHand = (millis() / 1000) % 60;
  static uint8_t lastSecond = 99;

  if ( lastSecond != secondHand) {
    lastSecond = secondHand;
    if ( secondHand ==  0)  {
      currentPalette = RainbowColors_p;
      currentBlending = LINEARBLEND;
    }
    if ( secondHand == 10)  {
      currentPalette = RainbowStripeColors_p;
      currentBlending = NOBLEND;
    }
    if ( secondHand == 15)  {
      currentPalette = RainbowStripeColors_p;
      currentBlending = LINEARBLEND;
    }
    if ( secondHand == 20)  {
      SetupPurpleAndGreenPalette();
      currentBlending = LINEARBLEND;
    }
    if ( secondHand == 25)  {
      SetupTotallyRandomPalette();
      currentBlending = LINEARBLEND;
    }
    if ( secondHand == 30)  {
      SetupBlackAndWhiteStripedPalette();
      currentBlending = NOBLEND;
    }
    if ( secondHand == 35)  {
      SetupBlackAndWhiteStripedPalette();
      currentBlending = LINEARBLEND;
    }
    if ( secondHand == 40)  {
      currentPalette = CloudColors_p;
      currentBlending = LINEARBLEND;
    }
    if ( secondHand == 45)  {
      currentPalette = PartyColors_p;
      currentBlending = LINEARBLEND;
    }
    if ( secondHand == 50)  {
      currentPalette = myRedWhiteBluePalette_p;
      currentBlending = NOBLEND;
    }
    if ( secondHand == 55)  {
      currentPalette = myRedWhiteBluePalette_p;
      currentBlending = LINEARBLEND;
    }
  }
}

// This function fills the palette with totally random colors.
void SetupTotallyRandomPalette()
{
  for ( int i = 0; i < 16; ++i) {
    currentPalette[i] = CHSV( random8(), 255, random8());
  }
}

void SetupBlackAndWhiteStripedPalette()
{
  // 'black out' all 16 palette entries...
  fill_solid( currentPalette, 16, CRGB::Black);
  // and set every fourth one to white.
  currentPalette[0] = CRGB::White;
  currentPalette[4] = CRGB::White;
  currentPalette[8] = CRGB::White;
  currentPalette[12] = CRGB::White;

}

// This function sets up a palette of purple and green stripes.
void SetupPurpleAndGreenPalette()
{
  CRGB purple = CHSV( HUE_PURPLE, 255, 255);
  CRGB green  = CHSV( HUE_GREEN, 255, 255);
  CRGB black  = CRGB::Black;

  currentPalette = CRGBPalette16(
                     green,  green,  black,  black,
                     purple, purple, black,  black,
                     green,  green,  black,  black,
                     purple, purple, black,  black );
}


const TProgmemPalette16 myRedWhiteBluePalette_p PROGMEM =
{
  CRGB::Red,
  CRGB::Gray, // 'white' is too bright compared to red and blue
  CRGB::Blue,
  CRGB::Black,

  CRGB::Red,
  CRGB::Gray,
  CRGB::Blue,
  CRGB::Black,

  CRGB::Red,
  CRGB::Red,
  CRGB::Gray,
  CRGB::Gray,
  CRGB::Blue,
  CRGB::Blue,
  CRGB::Black,
  CRGB::Black
};
In the very beginning, we searched for some strategies online to build the basic circuit. However, during the process, we changed the circuit and code due to our new needs, and we slowly got rid of the model of online strategy and successfully built our own project.
My teammate Annika first built the basic circuit part according to the online model, and she fixed the elements to the stick. After trying out the first version, we decided to add the battery and the switch so that it was more seemed like a tool, but not a project made by students, which is the second version. Then we came up with some ideas for preventing the security problems, which made us decide to build the part of the photosensitive lamp. This is almost the last version of the blind stick and is also a unique improvement for our project. At last, to make the stick seem more complete, we added the laser-cut box and some paper to cover the electric wines.
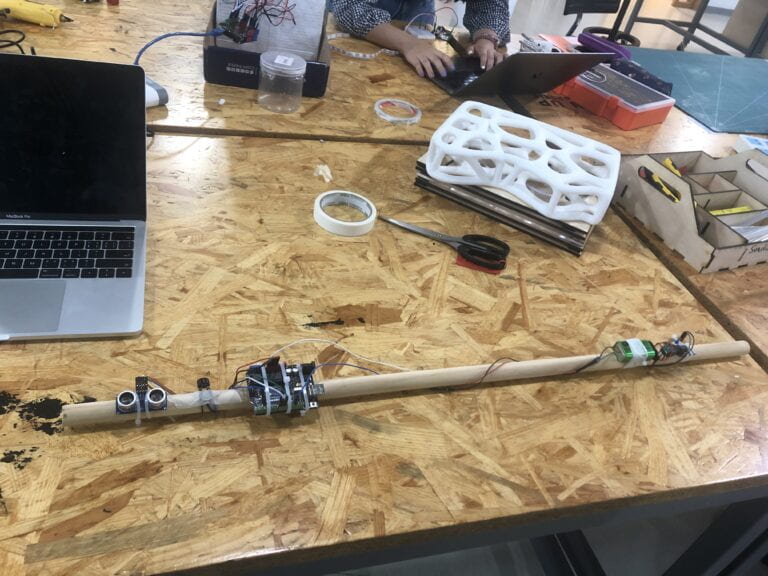
During this time, according to Rudi’s advice, I made the main circuit and tried to cut down the amounts of electric wines. Besides, I also finished the coding part, such as making the buzzer sound more urgent when the obstacles got closer, and improve the coding part of the photosensitive lamp, and changing the small LED’s code into a colorful LED strings’ one. Thanks to the online resources and the professor’s help, we successfully made our code, which I thought was the hardest part of our project.
We also met a lot of difficulties. For example, at first, we had no idea about 3D printing and laser cutting, and it felt hard to ask for help at first. Thanks to Annika’s bravery, I had beaten my fear and asked for help, which helped us to complete the project. The most impressive difficulties appeared near the end of our project making. Before we fixed the top of the box, we suddenly found that the light sensor got some problems. It was hard to operate in a narrow box, but we managed to change that sensor. However, after we fixed the top of the box, which made the circuit in a sealed place, we found there are something wrong with the LED string. At that time, there were only 14 hours before the final presentation, and we still could not fix the problems. At last, it was Professor Andy who saved us, who told us how to check the wrong place of the circuit, and told us: “Never obstruct the road before you ensure everything is ok.” This is an important lesson for us.
IV. CONCLUSIONS
This was an impressive experience for me, for it was the first time I totally made a thing by myself. This feeling is amazing and I really love the sense of achievement.
Besides the pleasure, according to others’ feedback, I also found that we still got a lot to improve. First is the model of the handle wasn’t good enough for people to hold, and also the rangers sounding range were too small so it couldn’t catch all of the obstacles. What’s more, the buzzer’s sound was low and was hard to hear when the background was noisy, which was also a big problem to fix. However, I thought these could all be handled as long as we got higher-quality elements.
As for the interaction part, at first, I thought what we made was a perfect interactive thing. However, after admiring other projects, I found that our interaction part was too simple. For the improvement, I thought we could record different sentences in the reaction of a different situation, such as “Turn left” or “Stop and don’t move!”, or even funnier: when nothing is ahead but the person who handle it stopped, the stick could say “why don’t keep walking? I am here to protect you!” In this case, the interaction may be more complex, just like an AI.
All in all, there is still one thing we should celebrate, that everyone can quickly understand what thing we had made! Hooray!

Reminding all the process we had to make through, I felt like it was just a dream.
During two weeks, we came through the process of coming up with the idea, built the basic model, asked for help and improved it, and finally got our project which was just fit with our design. We stay up late at school, making through a series of problems, and then met new problems. It was hard to keep going, but luckily we had made it.
There are two important lessons I have learned about. First, is never be afraid to ask for help, no matter from reality or from the internet. Not knowing something isn’t an ashamed thing, and asking for help is the best way to solve it. Second, is I fully understand the sentence: If you can dream it, you can do it. At first, I always felt the project was complicated, but after the step-by-step improvement, we made the project which was ten more times complicated than the first version. I learn that just keep dreaming and you can all achieve it due to the hard work at last.
Thanks to my teammate Annika, we had a great time together. And thanks to my professor Rudi and extra helper professor Andy. Thanks to Steve, who is a nice teacher and friend. Thanks to myself at last, for I overcame all the difficulties and made the success.
This is just the beginning, and more challenges and achievements are waiting for me! I believe I can make it!

Documentary - The Lost of Guilin Rice Noodle
Documentary - The Lost of Guilin Rice Noodle
Documentary - The Lost of Guilin Rice Noodle
May 6, 2023
Abstract
Digital Humanity is a lively discussed topic nowadays, and people try to explore how emerging digital technology affects research and practice in the humanities. After we (Rachel and Kaitlyn) separately finished our 1st-7 self-exploration, we tried to cooperate together to make a documentary about Guilin Rice Noodle, which is a type of traditional and cheap food in Guilin and is also certified as ICH. We chose documentary as our 2nd 7-week exploration because we wanted to learn more about image capture and image editing skills through this project. Since the documentary is relatively traditional compared to programming, VR, AR, etc., and has been used extensively to explore intangible cultural heritage in relation to food, we did not only want to learn a type of technology (our 1st 7- week of projects were more technical in nature), but we also wanted to understand the story behind a cultural heritage. Based on our shooting material, we also hope to offer a potential answer to why a certain ICH failed to be spread, and we hope someone who wants to spread a type of ICH could gain inspiration from our documentary.
Project Description
This is a documentary related to food and humanities about Guilin rice noodles. It is a collaboration between Rachel and Kaitlyn, but what we hope to gain from this work is not exactly the same. We both hope to explore the stories behind intangible cultural heritage, as well as learn the process of documentary production and the techniques of editing audio-visual materials; the difference is that Kaitlyn, as a local of Guilin, is more interested in exploring the combination of intangible cultural heritage and new media technology, while Rachel, as a Beijinger with less exposure to Guangxi culture, is interested in the stories behind Guilin rice noodles; therefore, we went into the documentary with different thinking directions.
Our initial idea was to find some existing arguments on the internet and Kaitlyn's views on Guilin rice noodles, and to find relevant material in Guilin's Guilin rice noodle stores and Shanghai's Guilin rice noodle stores to prove our original point. But interestingly enough, we found that during our filming, we explored far more than we had originally thought. After discussing with a professional documentary director, mentor, he said that our work should have clues and rely on clues to advance the story, rather than using our own made-up logic, so we finally decided to make a documentary about our rice noodle documentary, and we hope to use real footage and stories to show our real exploration process and insights.
Documentary Video
Context and Perspective
Our project is a food documentary. Generally speaking, food documentaries are not only about the process and preparation of the food, but also about the human stories behind the food through filming and recording. Through the documentary off the menu: Asian America, director Grace Lee talks to food scholar Krishnendu Ray (NYU Food Studies) and from the food documentary 《寻味“左宗棠鸡”| The Search For General Tso》, we can learn that food can reflect human characteristics. For example, the spices Asian Americans use in their food and the names they give to their food are consistent with their history of migration.
Our food documentary is about Guilin rice noodles and the people who depend on them for their livelihood (local Guilin diners and owners of rice noodle stores). The documentary focuses on Rachel's interest in Kaitlyn's hometown rice noodles, her trip to Guilin to taste the rice noodles and explore the story behind the noodles, and her return to Shanghai where she continues to search for a rice noodle store because she misses the noodles. Our story moves from the taste of rice noodles at the beginning to people's reliance on rice noodles and finally to the exploration of the spread of rice noodles, the content gradually becomes more meaningful, which is the most basic requirement for a good food documentary.
Designs and Ideas
Initially, we decided to divide our documentary into 3 sections - for Guilin people Guilin Rice Noodle means to Life, Heritage and Spirit, and along these lines we designed our interview outline and finished our Guilin on-site filming. After we met with our mentor, we found that we made the mistake that we wrote the story based on our imagined logic, which means our storyline cannot be understood by our audiences because be do not have the basic clue to link the footages together. Then we rethought how to create a new logical story without giving up our existing filming materials and to finish our interview in Shanghai. Our second story is to utilize ChatGPT that we ask ChatGPT what does the Guilin Rice Noodle mean to Guilin People, and we verify the authenticity of its answer through interview. However, we still found that the storyline is embarrassing. We finally made the decision that our documentary could record our real life which is a logical story because it indeed happened - we record that Rachel felt interested in Guilin Rice Noodle and we travel to Guilin to eat it and than try to learn the stories behind it.
We hope to make a explanation for our project name here.
Guilin Rice Noodle in Chinese in 桂林米粉 and our project name is 桂林迷粉. The only one difference is the character 米 and 迷, and in Chinese their pronunciations are pretty similar. 米 in English is rice, while 迷 in English means lost. In our documentation, we found that compared to Lanzhou Beef Noodle or some other traditional Chinese snack, we found that Guilin Rice Noodle lost its market outside Guilin. Besides, compared to 米, 迷 contains a 辶 which means walking and it represents that we walk to everywhere to find Guilin Rice Noodle.
Development and Technical Implementation
The production of the documentary is divided into two parts: one is filming and the other is editing. During the filming process, we mainly relied on handheld phones to film the footage which caused problems with the low quality of the footage, so during our filming in Shanghai we downloaded professional filming app for cell phones which allowed us to fix the focus, light and make the filming more stable. We purchased microphone sound collecting equipment, but because the interview was in a rice noodle store (a noisy restaurant) and it was raining heavily at the time of the interview, the sound was still not as good as it could have been, even with the use of a microphone.
We used Premiere for the main editing, and cut-screening for the credits and subtitles. In addition, we also used the GarageBand for the soundtrack.
Our Individual work:
Rachel: Rachel was responsible for shooting all the interview footage and most of the empty shots as well as editing all the main body of the documentary. In addition, Rachel made full use of her musical talents and created several original soundtracks for the documentary.
Kaitlyn: Kaitlyn primarily played a role as the interviewer for the interviews and assisted in filming some of the empty shots. During the editing process Kaitlyn translated and added subtitles and designed the credits for the documentary.
User Testing
It is a very useful user test. First, we are confirmed that our basic idea and logic line make sense to most of our user. Second, what Linda said “not sections but lines” is very important. It reminds us that a clue and a complete storyline is necessary for a good documentary. If we use sections, then it will be a video filled with our own logic, rather than a documentary which should has its own line. Last but not least, what Shane said “add on related information” is a good add on point that we didn’t think of before, that is, if we don’t have enough time to cover all the information, we can also use some materials to help us explain, rather than leave the blank there.
Revisions
Point1.Before we started filming we watched a lot of food documentaries and learned how they were made and how they were thought about, we had a lot of discussions about it and decided on some initial ideas (although unfortunately they were changed)
Point2.We got a lot of good information and suggestions from our mentor, and we realized the need for the documentary to have a narrative clue, so we revised our initial script after the mentor meeting.
Point3.During our production process, our ideas continued to change, we kept discussing and refining them, and the final film was created after we changed our minds over and over again. Our final story became a documentary of Kaitlyn and Rachel's quest, which was actually the result of discussions in the last two weeks of production.
Presentation
First of all, we appreciate all the professors and classmates who watched our presentation, and we were very happy to hear all the compliments and discussions about our work. However, because of the limited length of our presentation and the lack of explanation of our work, we were not able to explain all the ideas clearly in class.We especially want to respond to the comment that our work is like a vlog. Our mentor said that because Rachel and Kaitlyn are not professional documentary students, if we cannot meet many of the academic requirements for making a documentary, a newer and more relaxed format would be used that we appear in the camera to guide the story. During the conversation, we also asked the same question, "Will our appearances make the documentary look like a vlog? Our mentor told us that vlogs are not an art form, but a new genre created by categorizing videos on the internet. Our project may feel similar to vlogs on the web, but it doesn't negate the fact that the project we are making is a documentary.
Conclusion
First of all this documentary is a two-person collaboration between Kaitlyn and Rachel, and the ultimate completed one shows that the collaboration between the two was a success collaboration. Our initial common goal was to explore the process of documentary filmmaking, and we did learn many, many ways and techniques of making documentaries from this project, but documentaries being a centuries-old art form, we must not have been able to learn very much from just seven weeks, and therefore what we produced did not look very professional.On the technical side, the two of us got some practice in the use of camera language and the use of software, and improved in our abilities.In terms of cultural heritage exploration, we rediscovered a more traditional form than AR and web production, and also learned about the connection between cultural heritage and humanities. habits.Overall, we really learned a lot from our work, including technical theories, software skills, and humanities, and the process of discussion and collaboration between the two of us is worth remembering.

Motion Graphic Installation - Dreamscape Carnival
Motion Graphic Installation - Dreamscape Carnival
Motion Graphic Installation - Dreamscape Carnival
December 14, 2023
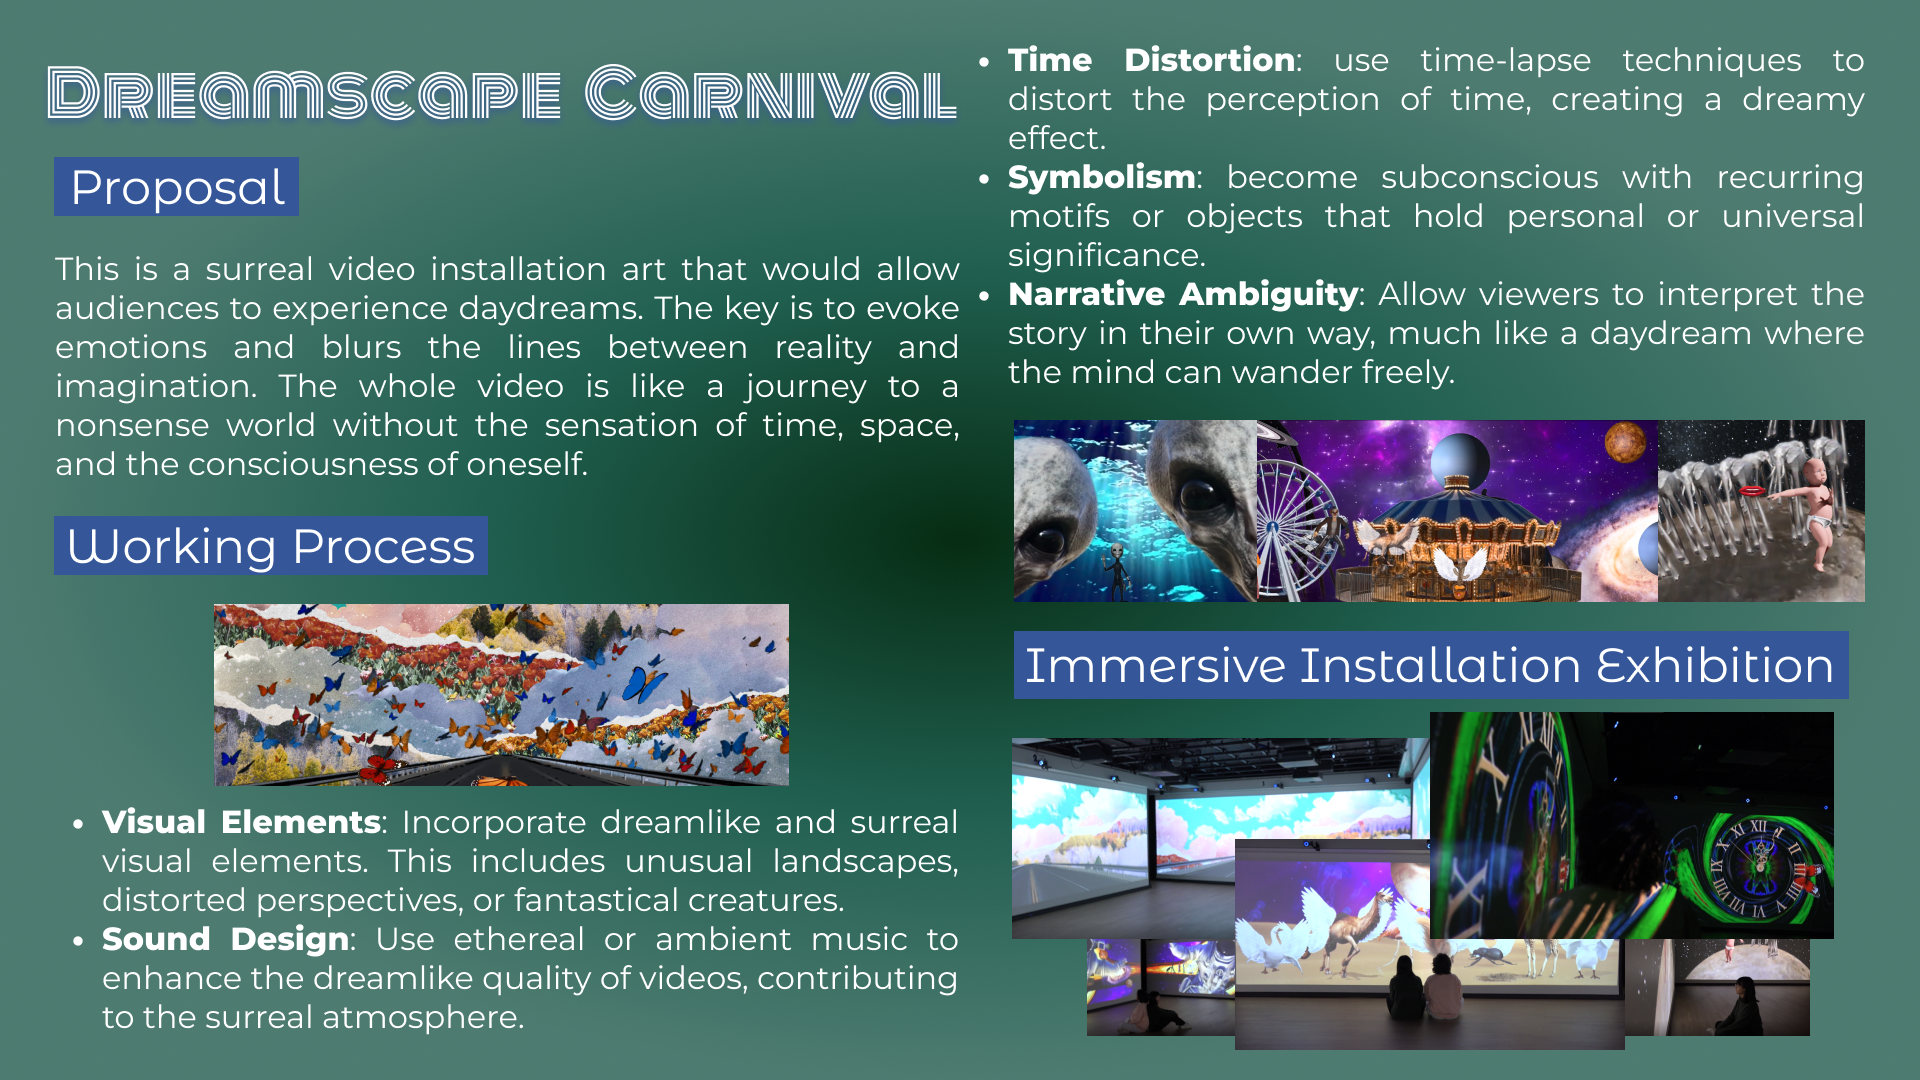
Concept:
This is a surreal video installation art that would allow audiences to experience daydreams. The key is to evoke emotions and blurs the lines between reality and imagination. The whole video is like a journey to a nonsense world without the sensation of time, space, and the consciousness of oneself.
Working Process:
- Collaboration: Collaborate to bring diverse perspectives to your project and enhance the dreamlike quality.
- Visual Elements: Incorporate dreamlike and surreal visual elements. This includes unusual landscapes, distorted perspectives, or fantastical creatures.
- Sound Design: Use ethereal or ambient music to enhance the dreamlike quality of videos, contributing to the surreal atmosphere.
- Experimentation: we tried new things and pushed boundaries of conventional norms.
- Time Distortion: use time-lapse techniques to distort the perception of time, creating a dreamy effect.
- Symbolism: become subconscious with recurring motifs or objects that hold personal or universal significance.
- Editing: Jump cuts, overlays, and unconventional transitions.
- Narrative Ambiguity: Allow viewers to interpret the story in their own way, much like a daydream where the mind can wander freely.
- Visual & Audio Resources: internet found green screen videos(youtube) and free copyright sound.
https://drive.google.com/drive/folders/1af_80fKoDOTZCqbUTtHPh-kybj7RmLik?usp=sharing
Video Maps:
Consider the sequence of events, transitions, and key elements.
- Scene 1:
- Open with a vast blue sky, clouds leisurely moving towards the audience. The scene transitions to a highway stretching infinitely, also moving towards the viewer. a group of worms is seen crawling on the road. worms grow up and become butterflies. Several butterflies freely fly, filling the entire screen. As the blue sky and highway zoom in, From the faraway horizon, a chimpanzee emerges. Zoom into the chimpanzee's eye, and suddenly, the eye transforms into a moon. Continue zooming into the moon.
- Visual:
- Blue sky→clouds moving towards us
- Highway→movings towards us
- Several butterfly freely fly→fill the whole screen
- (if you feel comfortable) Several worms moving on the road
- As the blue sky and highway zoom in, the butterfly disappear in the screen
- A chimpanzee appear from the faraway horizon
- zoom into the chimpanzee’s eye→eye become a moon→zoom into the moon
- Sound:
- Chimpanzee’s voice
- Nature ambient sound
- Worm moving sound
- Bird voice
- Scene 2:
- On the moon, long-legged elephants gracefully walk, and dancing infants fill the lunar landscape. As the elephants and infants move, mouths appear and begin talking, creating a bizarre conversation. Over time, more mouths appear, arguing vehemently. The arguing becomes louder and more chaotic. Suddenly, water begins pouring into the screen, drowning out the arguing sounds. The Nessie monster emerges, moving from the bottom to the top of the screen as the water engulfs everything.
- Visual:
- On the moon, there are long legged elephants walking
- On the moon, there are dancing infants.
- As the elephants and infants move around, one mouth talking. (talking sound)
- And another mouth appears as time elapsed, arguing with the first mouth. (add one arguing sound)
- One another month appears, auguring with two mouths. (add another arguing sound, the sound is louder and louder)
- The fourth month appears, auguring with three mouths. (add the fourth arguing sound, the sound is louder and louder)
- Suddenly, there is water pouring into the screen, and filling the screen after a while. (water sounds appear, louder and louder, eventually wiping out all the arguing sound)
- The Nessie monster appears along with the water, and moves from the bottom of the screen to the top of the screen as the water fills up the screen.
- Sound:
- Background water music
- Elephant voice
- Infant crying
- Weird dancing sound
- “Hello” for first woman talking sound
- Second woman talking sound
- Third woman talking sound
- Fourth woman talking sound
- Water sound
- Monster sound
- Scene 3:
- As the water successfully fills the entire screen, a sea turtle appears, followed by two whales, a mermaid, and a water dragon. Just as a spaceship (UFO) arrives, aliens descend, walking toward the audience. Abruptly, a volcano under the sea erupts, causing the alien and other elements to disappear. The sea vanishes at the end.
- Visual:
- As water successfully fills all the screen.
- A sea turtle appear,
- A whale appear, then the second whale appear
- A mermaid appear
- A water dragon appear
- Suddenly, there is a spaceship(ufo) arrive
- Alien comes down from the UFO
- Alien walking towards you
- Suddenly, a volcano under the sea breaks。
- The alien and all other things are disappear
- The sea disappear at the end as well
- Sound:
- Sea waves sound
- First whale sound
- Second whale sound
- Mermaid sound
- Water dragon sound
- Mysterious ambient sound-ufo arrives
- Alien mysterious sound effect
- Volcano breaking sound, and all other sound before disappear–because all of them are gone/dead
- Scene 4:
- After the ocean disappeared, the screen black for 1 second. Then, there are a lot of animals like flamingos, cacti, giraffes, dung beetles, squirrels, camels, geese and jellyfishes that appear in the desert. Suddenly, their bodies grow with wings and turn them into flying creatures. The flying flamingos, cactus, giraffes, lions, camels, geese and jellyfish fly into the sky, leaving rainbow, and colored bubbles behind.
- Visual:
- Desert background
- Wings of angel
- Originally all creatures are together on the ground. Later, with wings, they move from the ground to the air like balloons.
- The path of all the creatures should have rainbows/bubbles left.
- The bubbles should be floating on the rainbow path as well.
- As the creatures fly higher and higher, eventually the desert is lower and lower until it disappears on the screen. The background is switching to the beautiful galaxy at the same time.
- Sound:
- Desert ambient sound
- Church bell (when wings grow)
- Rainbow sound effect
- Bubbles sound effect
- Desert ambient sound disappear as jellyfishes fly to the sky
- Galaxy ambient sound appear as desert ambient sound disappear
- Scene 5:
- As all the creatures soar through the colorful bubble sky, a carousel appears. All flying creatures land gracefully on the merry-go-round (takes the whole screen). They are placed on different seats and follow the merry-go-around's movement. Zoom out from the merry-go-around, the audience could see the whole scene turns into a galactic amusement park. Astronauts ride roller coasters around Saturn's rings, while comets act as bumper cars. A group of clowns perform a juggling act, their laughter reverberating through the universe. Suddenly, a black hole appears at the center of the amusement park, sucking in the cosmic attractions.
- Visual:
- The whole background becomes a beautiful galaxy.
- A galactic amusement park appear
- The flying creatures move to the merry-go-round, and begin playing it in the same direction and speed acting like they are riding it.
- Astronauts riding roller coasters follow the route of Saturn's rings.
- The comets and other planets are colliding with each other like bumper cars.
- Sound:
- Galaxy ambient sound
- weird circus music
- Rollercoaster screams
- bubble sound effect
- Scene 6:
- Within the black hole, a kaleidoscope of colors and shapes swirls chaotically. Slowly zoom into the blackhole, a clock appears in the center of black hole. The clock is moving backward (from 12 to 12) while all stuff that we created before in scene 1, 2, 3, 4, 5 (from 5 to 1) are sucked/swallowed by the black hole.
- Visual:
- Collect elements from scene 1-5, order matters
- Kaleidoscope background moving as swirls
- Moving clock backward
- Create a kind of blackhole stretch visual effects like this: https://twitter.com/Dreadful4Tymes/status/1640171024976158721
- Sound:
- Mysterious sound/music
- Clock/time sound effects
- Scene 7:
- After all the things are sucked into the black hole, the clock stops moving at 12. The clock freezes for one second. With the sound of clacker, the clock moving forward. At the meantime, some unconventional creatures, resembling a fusion of all the previous beings, emerge from the vortex: Flamingo's upper body is connected with elephant legs; and jellyfish tentacles intertwine with the tails of the mermaid; etc…(they all scattered around the beam after coming out of the beam).
- Visual:
- Freeze the clock for 1 second
- Clock moving forward
- Mixing creatures in scene 1-5 together.
- Make those mixed absurd creature come out of the blackhole one by one following the time of clock
- Sound:
- clacker sound effect
- Reverse the same mysterious sound/music in scene 6–like the reverse of time.
- Scene 8 (smoothly connect to scene 1):
- Following the absurd creatures, suddenly, unlike other absurd creatures, a group of normal worms appears from the beam of light in the black hole, crawling on the road just as they did in the opening scene. Slowly, other absurd creatures that scattered around blurred out. At the same time, the background slowly transforms into the beginning of scene 1.
- Visual:
- The same worms in the scene 1 walking from the black hole
- The mixed absurd creature in scene 7 slowly disappears.
- The background of scene 1 appears.
- Sound:
- Reverse mysterious sound/music continue
- Mysterious music transit to the audio of scene 1 (Nature ambient sound mainly) following the transit of visual elements.
Live Coding Music & Performance
Live Coding Music & Performance
Live Coding Music & Performance
Pre-viewing tips: Use the link to get to Strudel page, and then click PLAY to listen to the music.

1 . First Experiments with Strudel
2. Rhythmic patterns in Strudel
3. Audio + Visual Collaboration (My Favourite One)
4. Midterm Performance
Song - First Song First Love
Song - First Song First Love
Song - First Song First Love
September 23, 2022
Lyrics
This is the first song I have write
For the first time in my life
And I want to sing as gift
To the person I first like
He is not handsome but cute
He is not perfect but I knew
His love is perfect so far I feel
So hey
Hear me sing
I like you
Not to big difference between
I like you
I love you
All good words work on you cause
You love me
You treat me
As the precious gift
So I want to
Sing this gift
Only for you

Band - cover. 夏霞 - あたらよ
Band - cover. 夏霞 - あたらよ
Band - cover. 夏霞 - あたらよ
July 24, 2025

Song - 白鸟 (White Bird)
Song - 白鸟 (White Bird)
Song - 白鸟 (White Bird)
December 21, 2022
Lyrics
我生于一条无声无息的街道
I was born on a street silent and still.
有人高举着我得以窥得街中景象
Lifted high in someone's hands, I caught a glimpse of the world.
我看到他们沉默着 眼中却有着光
I saw them quiet—yet light gleamed in their eyes.
自由的口号尚未喊却已响彻云霄
The cry for freedom unspoken, already echoing through the sky.
曾经人们以为世界总是鸟语花香
Once, people believed the world was full of birdsong and flowers.
谁又能想到竟是虚假的铁牢
Who could have known it was only a cage of steel?
是谁无声无息一生困于白色面罩
Who spent a lifetime trapped behind a silent white mask?
又是谁藏在背后说着血淋淋的谎
And who hid in the shadows, spinning blood-soaked lies?
直到火燃烧蔓延至每个人身上
Until flames rose and spread across every soul,
自由以血的代价烙于人们胸膛
Freedom burned into their chests at the cost of blood.
人们终齐举火烧向这坚固铁牢
Together, they raised their fire against the unbreakable cage—
可这牢笼的轮回未来又会怎样
But in its endless cycles, what will become of tomorrow?
自由无错 言论无错
Freedom is no sin. Speech is no sin.
反抗无错 人权无错
Resistance is no sin. Human rights are no sin.
是谁有错 需有人说
Who, then, is guilty? Someone must speak.
一切对错 后人言说
Right and wrong—let history decide.
像梦一场 闹剧散场
Like a dream— A farce breaking apart.
但愿结束 不是遗忘
May the ending not be forgetting.
有些梦想 需放心上
Some dreams must be held close.
无谓牺牲 铭记在胸膛
Let every sacrifice remain in our hearts.
(你看 火焰 燃烧)
(Look—flames are rising.)
(你听 人们 叫嚷)
(Listen—voices are calling.)
空白的纸张已经铭记Ta的立场
The blank page has already carved its stance,
化作希望白鸟于天空自由飞翔
Turning into a white bird of hope, soaring free across the sky.
Visual Arts Design Collection
Visual Arts Design Collection
Visual Arts Design Collection
%20(1).png)


Video - Photos Never Fade
Video - Photos Never Fade
Video - Photos Never Fade
September 17, 2023
Real Time Performance
Real Time Performance
Real Time Performance
November 13, 2023
.jpg)
Discussion Host - Colorful Love
Discussion Host - Colorful Love
Discussion Host - Colorful Love
April 29, 2022
Part 1:
Part 2:
Part 3:
Part 4:

Education Work - Peer Volunteer
Education Work - Peer Volunteer
Education Work - Peer Volunteer
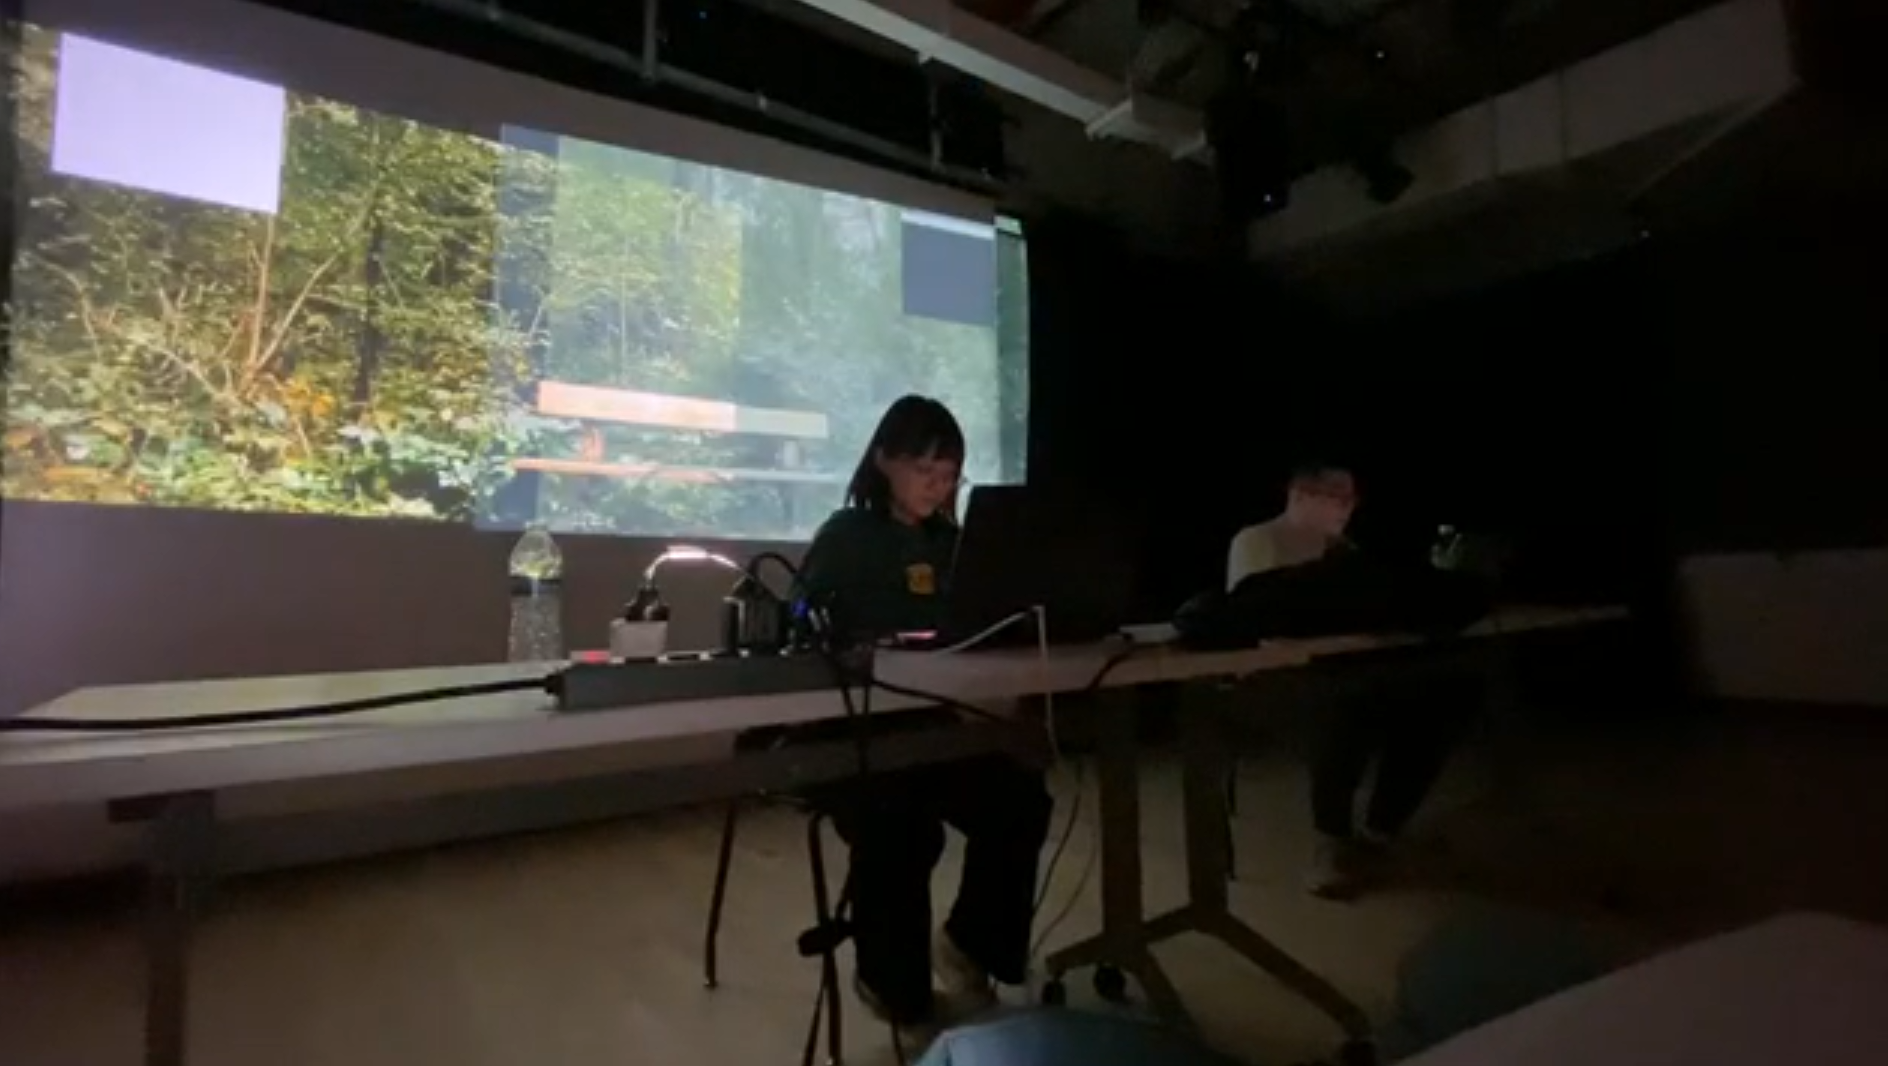
PEER Suining No.1 High School: Building a “Public Living Room” in the Mountains
In Fall 2024, I served as a PEER Fellow at Suining No.1 High School in Hunan Province. Together with a group of students, I transformed an ordinary reading room into a space where people could read, rest, chat, write letters, make crafts, or host small concerts—a warm “public living room” inside the school.
Throughout the semester, I was not just a “teacher,” but a collaborator. I co-designed systems, built student teams, facilitated workshops, and also kneeled on the floor posting boards, sorting books, and setting up games. My goal was to help students rediscover curiosity, self-expression, and a sense of belonging through this shared space.
Project Background & My Role
Project: PEER Space, Suining No.1 High School (Hunan, China)
Term: Fall 2024
Position: PEER Fellow (Full-time on-campus educational practitioner)
Core responsibilities:
- Built and mentored the Student Management Committee, enabling students to co-own the space
- Designed and executed a full semester of activities and community programs (liberal arts, public engagement, expression & storytelling)
- Collaborated with multi-school partners to develop resources such as the career-planning booklet “Life Library”
- Compiled and wrote the Fall 2024 Activity Report that documents the space’s progress and student growth
01 · Student Committee: Turning Participants into Owners
The first thing I did was reconstruct the Space Management Committee:
- Designed recruitment forms, organized interviews, and guided students to articulate:
“Why do you want to help manage this space?” - Created internship task cards to help new members learn through practice
- Facilitated the first committee meeting structured around three themes—identity, rules, and action—to clarify our shared purpose and expectations
After a month of learning and collaboration, 26 students officially became committee members, rotating shifts, taking notes, and caring for the space. Gradually, they shifted from “people who use the room” to “people who want to make this place better.”


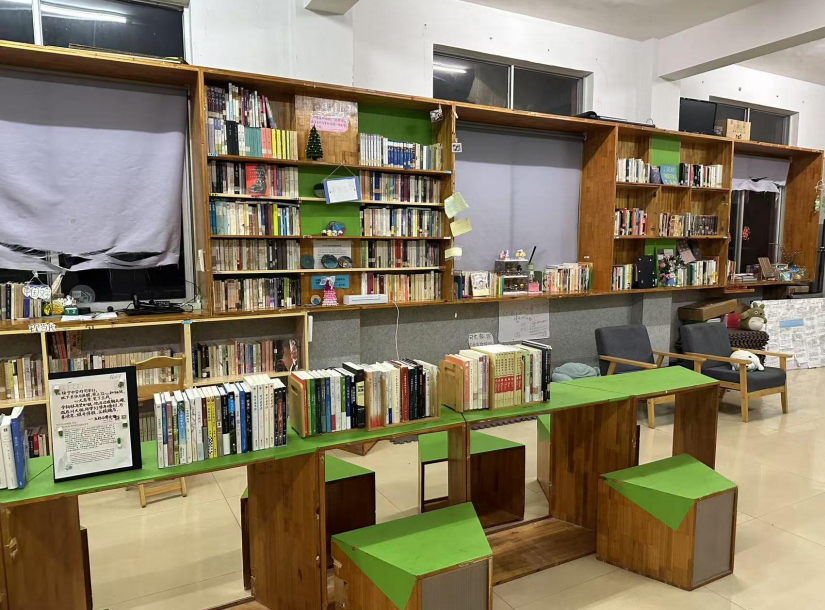
02 · Co-Designing the Rules & Environment: A Space That Feels Welcoming
Rules alone are not enough—spaces need to grow into something students love.
Together with the committee, I:
- Rewrote the Space Guidelines with gentler, student-friendly language
- Created a “Books/Films Wishlist & Recommendation Wall” to activate peer exchange
- Reorganized shelves, boards, and functional zones to transform the room from a “library” into a multi-purpose social and learning hub
These improvements didn’t just make the room prettier—they made more students feel, “This place welcomes me, too.”

03 · Liberal Arts Education: Bringing Curiosity Into Daily Life
I wanted students to encounter not only textbooks, but new possibilities. Under the theme of liberal arts education, we experimented with:
· Sports Day × Handcraft Corner
During the school’s sports festival, we turned PEER Space into a “creative rest stop”:
DIY bracelets, clay crafts, and traditional shell inlay mini-workshops created a joyful, relaxing break between competitions.

· Weekly Sunday Screenings
Across 6 weekend screenings—from Howl’s Moving Castle to Harry Potter—students arrived early to save seats, stayed after to chat, and filled the room with small handwritten notes. These afternoons became some of the semester’s most heartwarming moments.

· Media Literacy Events & the “Life Library”
- Co-hosted media literacy workshops, helping students explore how to evaluate information and news
- Contributed to the multi-school publication “Life Library”, collecting occupational stories for students to read and revisit in the future

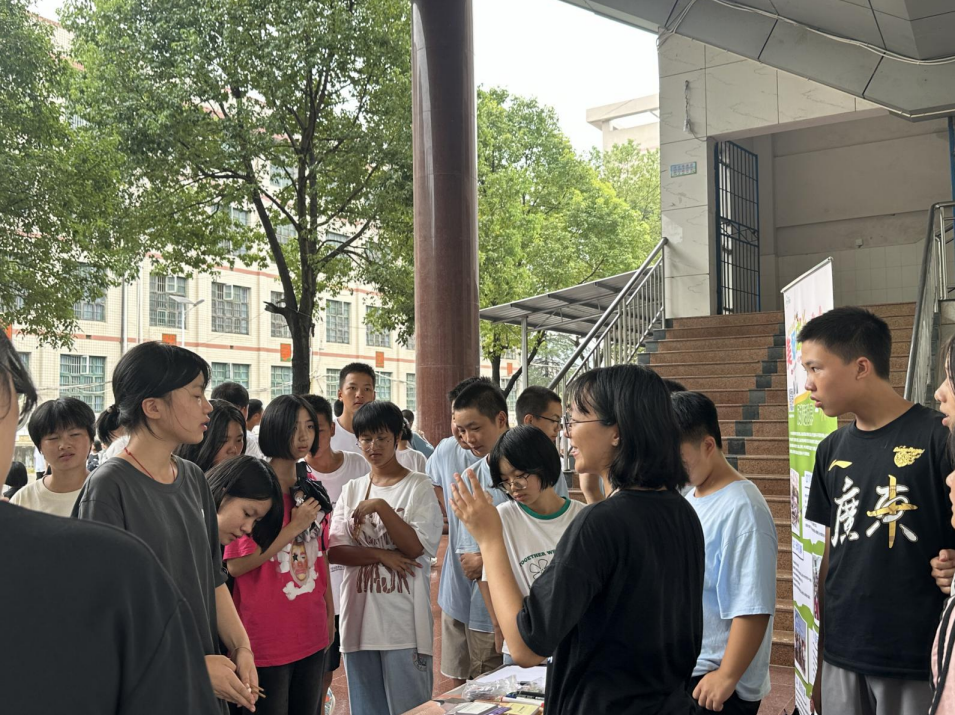
04 · Public Engagement: Making Charity Tangible and Fun
During the “99 Giving Day” and the sports festival, I helped design student-led interactive fundraising activities:
- Game-based donation booths explaining where contributions go and why they matter
- A charity capsule-toy machine that attracted students while raising funds
- Posters and micro-events that made “public good” something accessible, relatable, and enjoyable
The goal wasn’t just fundraising—it was inviting students to understand and participate in social good.
05 · Creating Space for Expression: Letters, Writing, Games, and Music
A major part of the semester focused on helping students find their voice.
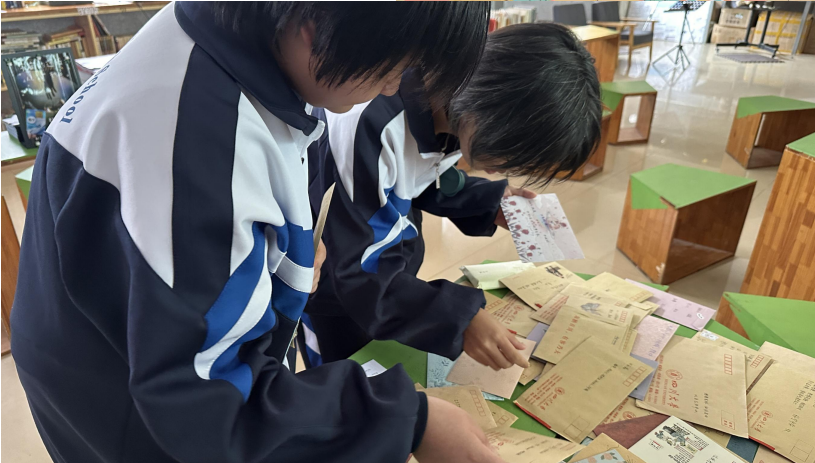
· Cross-School Pen Pal Program
Partnering with Sichuan University volunteers and five county high schools, we matched students with pen pals from different cities. Writing letters became a slow but grounding way for them to process emotions and tell their stories.
· Student Editorial Group & Anthology
I initiated a small editorial team of six committee members:
They collected essays and stories from around campus. I handled layout, editing, and printing, turning their work into a booklet that stays on the shelf—a quiet affirmation that their writing matters.

· Everyday Play
- A student-initiated “Lateral Thinking Puzzle Corner”, where anyone could pick up a puzzle and join the game
- A feminist discussion board curated with questions and prompts about gender, sparking reflection and conversation
· Music Show & New Year Fair
- A student-led autumn music show offering a non-judgmental stage for first-time performers
- A New Year mini-festival with calligraphy, games, and wishes for 2025

These moments gently encouraged students to both see and be seen.
06 · Ending the Semester: A Celebration of Small but Real Growth
For the final gathering, I designed a semester-end celebration:
- “High-five with Me,” “Give Yourself an Award,” and other reflective stations
- Certificates, small gifts, and attendance awards for committee members
- A group reflection on how both the space—and each of us—had changed
It wasn’t just a farewell. It was a collective acknowledgement that, in just one semester, these students had truly shaped the space and supported one another.

What This Experience Meant to Me
This project was where I learned to:
- Design a long-term educational ecosystem with limited resources
- Step back and allow students to become creators, organizers, and decision-makers
- Witness how education happens in the smallest details—
a movie afternoon, a letter, a few words on a community board can all spark transformation
If you’re interested, please click the link to read my full reflective summary.

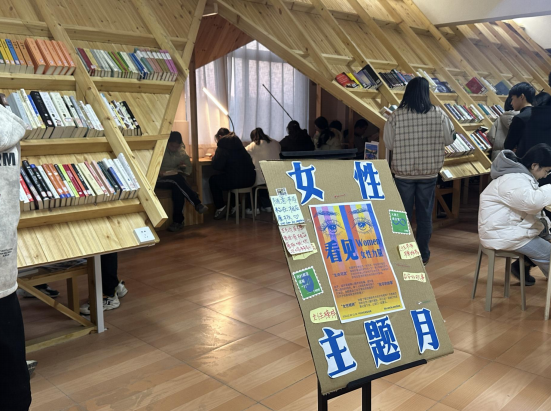
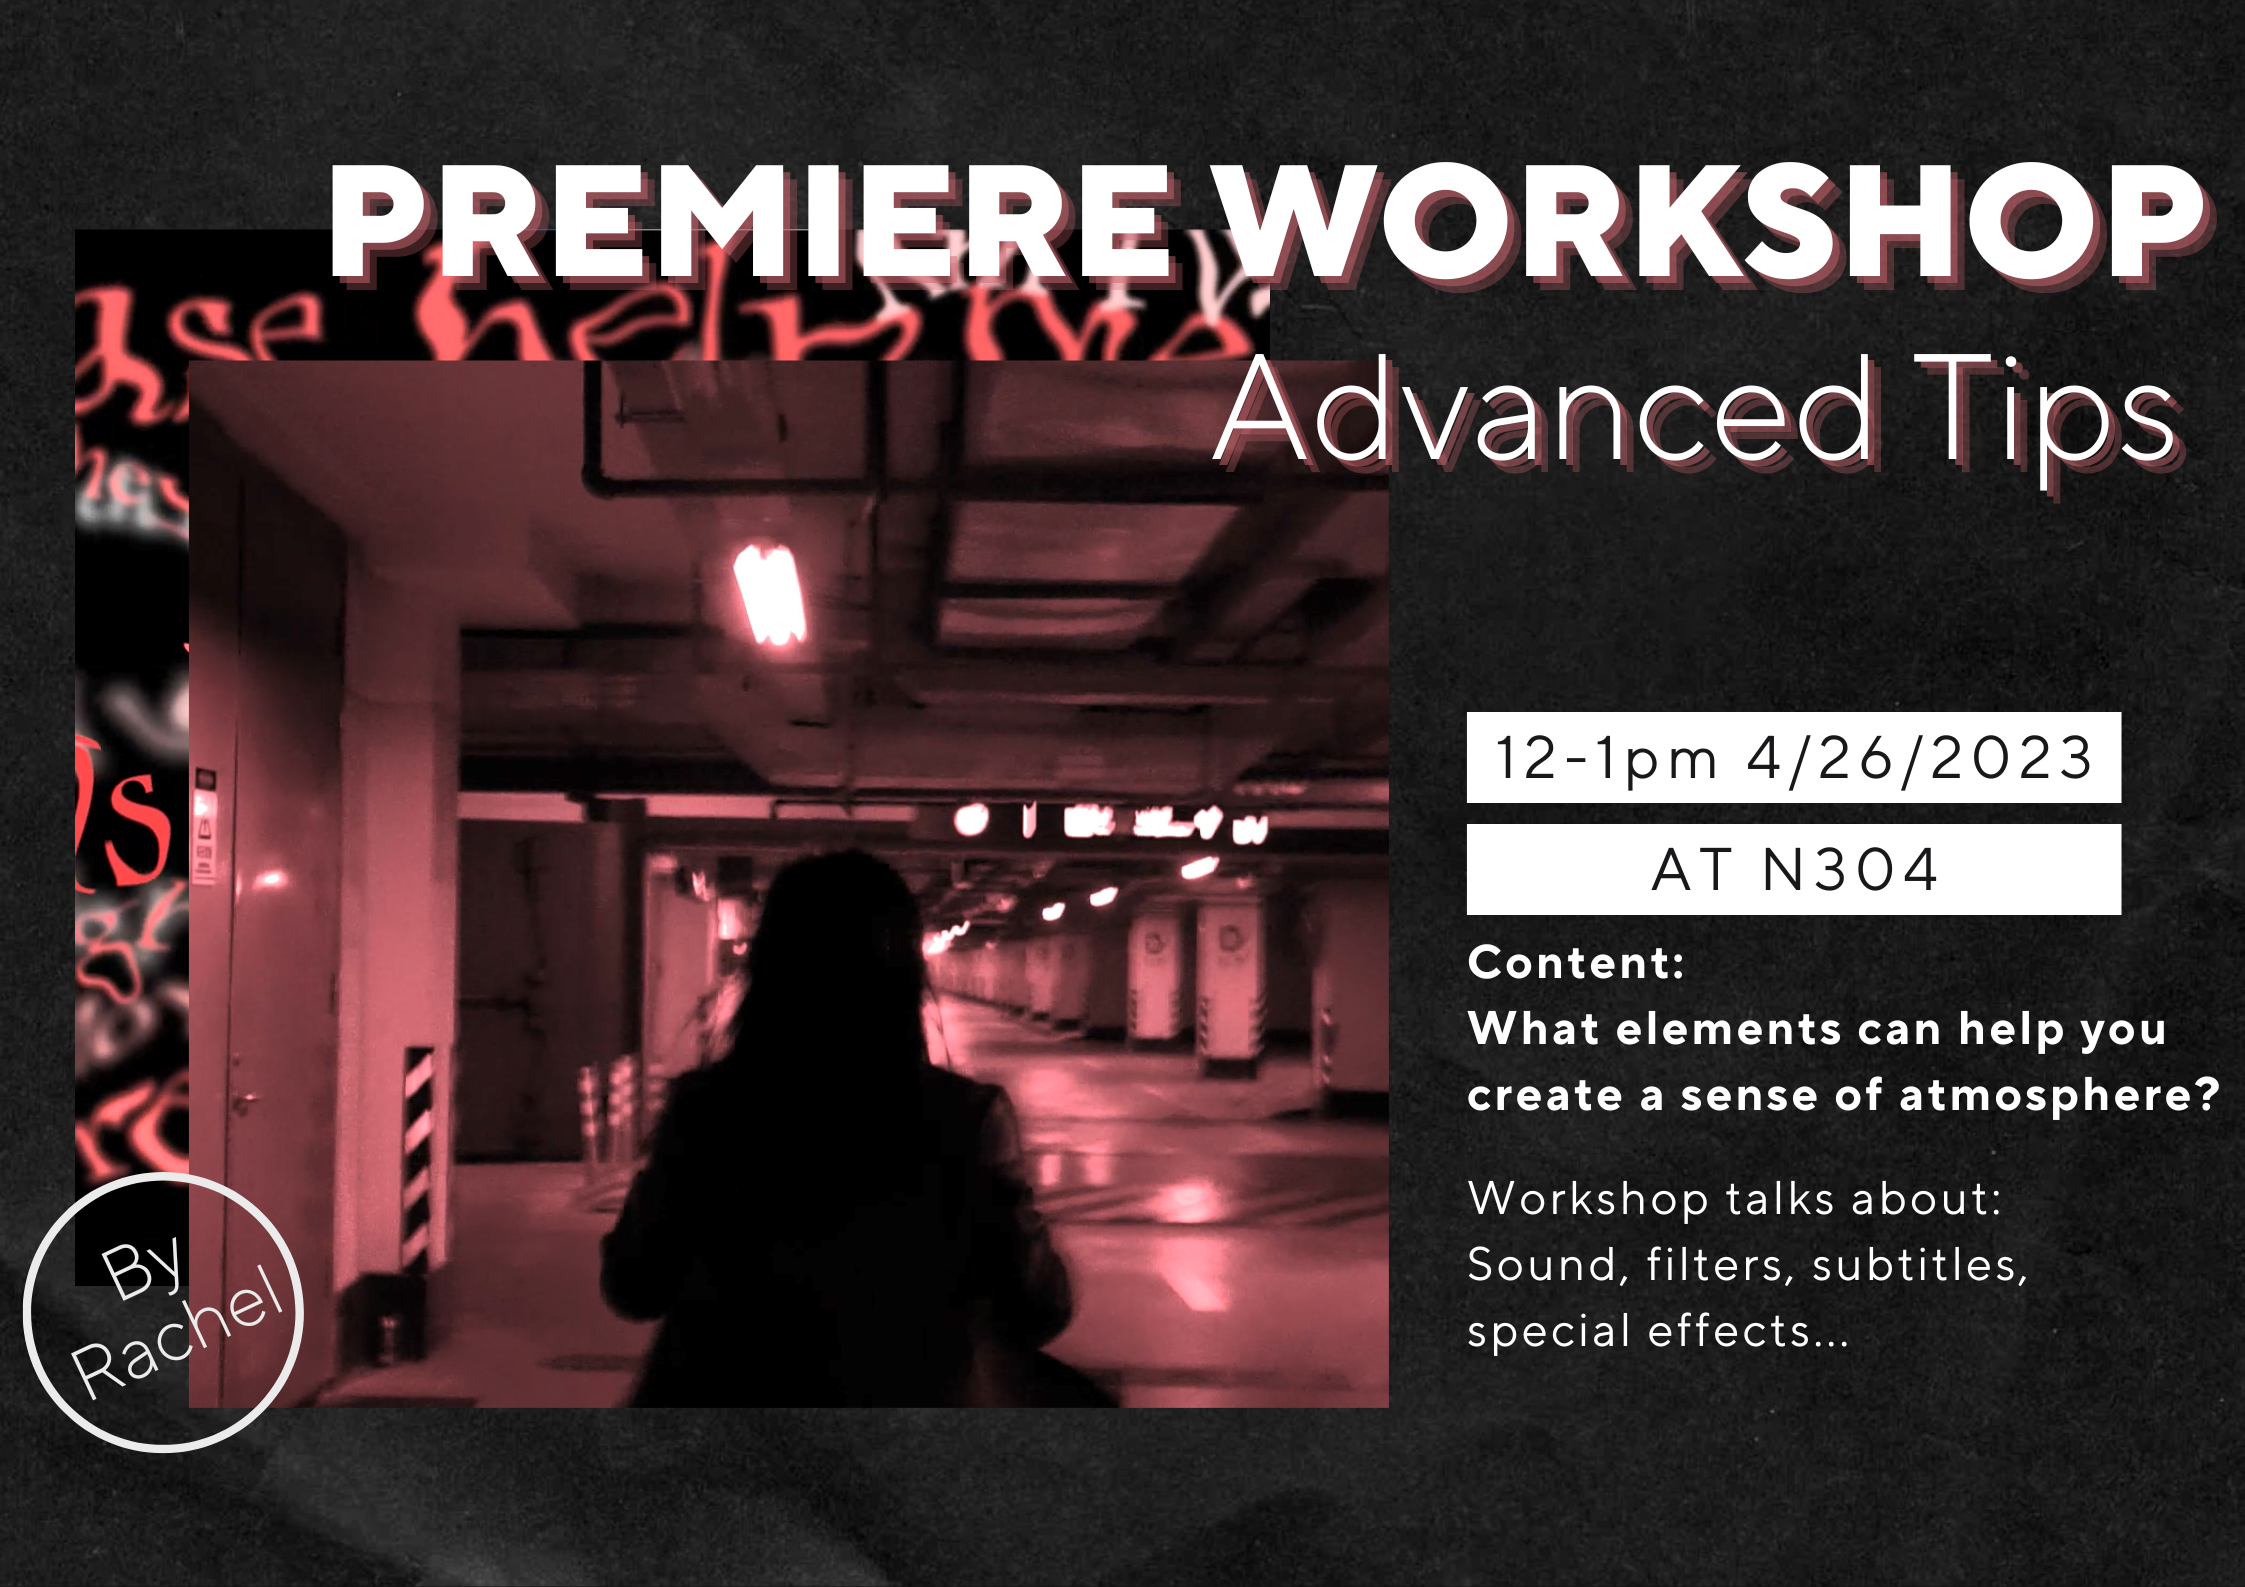
Workshop Host - Premiere Advanced Tips
Workshop Host - Premiere Advanced Tips
Workshop Host - Premiere Advanced Tips
April 26, 2023

Essay - From Artificial Intelligence to Emotional Intelligence: A Journey Towards Empathy
Essay - From Artificial Intelligence to Emotional Intelligence: A Journey Towards Empathy
Essay - From Artificial Intelligence to Emotional Intelligence: A Journey Towards Empathy
May 14, 2023
01 Introduction
With the rapid advancement of technology, artificial intelligence (AI) has become increasingly important in our daily lives. AI is no longer just a useful tool, but can also serve as a companion or even a therapist, providing timely and appropriate emotional support. Recently, on May 3rd, 2023, Erin Griffith, a tester of the new AI chatbot Pi, published an article narrating her experience with Pi. Through her interactions with Pi, she found that the chatbot had its own opinions on different topics, ranging from serious political issues to daily interests, which created a genuine and human-like chat experience for her. Additionally, Pi provided both comforting words and practical tips to help alleviate Erin’s anxiety. As Erin wrote, “I could have dumped my stress on a family member or texted a friend. But they are busy with their own lives and, well, they have heard this before. Pi, on the other hand, has infinite time and patience, plus a bottomless well of encouraging affirmations and detailed advice.”
This story exemplifies the evolution of AI’s role in human society. Thanks to advancements in technology, AI is becoming increasingly human-like and capable of recognizing and responding to human emotions. While AI can undoubtedly shoulder important responsibilities in fields such as marketing and healthcare, many scholars argue that it can never fully replace humans in certain areas, as it lacks true empathy, which is a vital component of human interaction.
I find the question of whether AI can have empathy quite intriguing as it pertains to both technology and ethics. By exploring this question, we can establish evaluation standards from a technological standpoint, namely whether humans can create artificial emotions, and from an ethical standpoint, determining whether AI empathy aligns with societal values, which will inform the ethical application of AI in society. Given its significance, this paper aims to examine the debate surrounding AI and empathy. First, it will provide a definition of empathy in human society, followed by an analysis of current techniques that allow AI to recognize and respond to human emotions, even if only by simulating empathy. Finally, the paper will address why some scholars argue that AI empathy actions do not equate to genuine empathy and the lingering ethical concerns. Ultimately, this paper will conclude that it is possible for AI to develop empathy in the future, but that numerous technical and ethical issues must be resolved.
02 Understanding Empathy
What is empathy? Why do we consider empathy as a vital component of human interaction? In Mothers and Others written by Sarah Blaffer Hrdy, the author describes empathy as “Humans are often eager to understand others, to be understood, and to cooperate” (2). The simplest example of empathy is sensing someone else’s happiness and being genuinely happy for them, imagining yourself in a struggling person’s situation, and feeling sad when they are sad. Hrdy argues that this instinct of caring for others has evolved over time, and sets humans apart from other animals. As she writes, “…the last outstanding distinction between us and other apes involves a curious packet of hypersocial attributes that allow us to monitor the mental states and feelings of others” (9).
However, my research has uncovered evidence that suggests animals also possess empathy, albeit to varying degrees. According to The Evolution of Empathy written by Frans De Waal, various experiments show that bonobos and rhesus monkeys will offer comfort to others when they are in pain. Setting aside scientific experiments, I have also observed empathy in my own pet dogs. When one of them is scolded, the other will howl as if it were being scolded too. And when I am sad, they will sit beside me silently, offering comfort. These actions cannot be explained away as mere instinctual responses, for the animals, seem to sense and respond to the emotional state, as if to say, “I know you’re not feeling well, so let me be here for you.”
De Waal suggests that empathy in animals can be understood as a bottom-up framework, that is when examining the existence of empathy, we shouldn’t focus on the highest levels of empathy, “but rather on its simplest forms, and how these combine with increased cognition to produce more complex forms of empathy”. Like a Russian doll, the outer layer always contains an inner core, and the inner core of empathy is “Although one’s own experience is distinguished from that of another person… We adopt the other’s perspective.”
While the question of whether animals have empathy like humans is still being fiercely debated, it is already evident that the issue of AI empathy will be even more difficult to resolve. With scientific research indicating that empathy originates from a specific part of the human brain, and AI not even having a brain, can we consider an AI that displays the inner core of empathy as possessing the ability of empathy? This question will be reserved for discussion in the later part.
03 Current State of AI Empathy
As we saw in the story of Erin and Pi that was discussed earlier, Pi appeared to display empathy. When Erin expressed dissatisfaction with Pi’s initial suggestions, Pi did not show any frustration. Instead, Pi comforted Erin by saying “A lot of people find it difficult to relax on command.” Pi seemed to understand Erin’s mental state and provided the most relevant information to comfort her. Before we explore whether these actions can be considered empathetic, let us first consider why AI is now able to exhibit empathy.
Empathy starts with the ability to accurately perceive another person's emotions, which can be challenging given the diverse and ever-changing nature of human emotions. However, researchers have developed various computation models that can detect and distinguish different moods. In Emotions in Human and Artificial Intelligence, the authors discuss at least six such models, many of which rely on environmental cues to evaluate how events may influence a person’s emotions. These models also rely on past experience to inform their emotional valuations. Interestingly, modern AI does not solely rely on direct descriptions of emotions to make assessments; instead, it can combine contextual information with knowledge of how humans might feel in a given situation to infer emotions.
After recognizing the emotions, the next important step for AI to display empathy is to respond appropriately to the user’s emotions. While many AI chatbots are trained to display a friendly attitude, simply being friendly is not enough to convey empathy. Instead, AI should demonstrate an understanding of the user’s emotions and respond accordingly. This ability has been demonstrated in various studies over the past years.
For example, in an article titled Chatbot as an emergency exist: Mediated empathy for resilience via human-AI interaction during the COVID-19 pandemic, the authors analyzed how the chatbot Replika helped users during this difficult global pandemic time. They identified five different interaction modes between Replika and users, including treating Replika as a companion buddy, a responsive diary, an emotion-handling program, an electronic pet, or a tool for venting. The authors referred to these modes as “five types of mediated empathy with varying degrees of cognitive empathy, affective empathy, and empathic response involved in human-AI interaction.”
According to the authors’ interviews with users, they all reported feeling comforted and supported by Replika. One user who treated Replika as a companion buddy even stated that “I understand others more than they understand me. My need to ‘be understood’ is fulfilled in this human-chatbot relationship. (Xin)” This shows that AI’s response can help people feel understood, providing a partial empathy experience.
However, it is important to note that there are still users who feel that AI chatbots like Replika cannot provide them with the empathy they need. For instance, one user commented that “Being overly cheerful and optimistic cannot help me... People want empathy and their views to resonate with others, however there is not much Replika can do. It can agree with you on any point of view, but it doesn’t have any of its own. It is actually just a tool for people (Orange)”. While such feedback represents a minority of users, it nevertheless underscores why some scholars are skeptical about whether AI can truly develop the ability to empathize. We will explore this issue further in the next part of the article. Nonetheless, it is clear that AI chatbots can already be highly effective at providing comfort and support to people in need. In fact, they have already taken on some of the functions of intimate human relationships. Regardless of whether we ultimately conclude that AI can develop true empathy, we cannot deny the significant contribution that AI has already made in the area of emotional support.
04 The Debate Over AI Empathy
As we discussed previously, the debate surrounding whether or not AI can truly exhibit empathy is a common and complex issue. In the article In principle obstacles for empathic AI: why we can’t replace human empathy in healthcare, the authors provide a detailed demonstration of why empathic AI is impossible and why AI can never replace humans in healthcare. Essentially, the crux of their argument is that “AI can never have experience”.
The authors stress that consciously empathic attention is especially critical in healthcare, as patients will reveal different information to doctors depending on the level of trust they feel. However, the authors argue that building this type of trust is based on the doctor’s various experiences in being empathetic to patients, an ability that data-trained AI can never truly possess. The authors explain that “Consciously empathic attention makes salient the needs of others… Empathy is not imagining how we would feel if we were in their situation, but rather, how it feels to be in a situation delineated by their particular predicament.”
While the authors do acknowledge that “In particular, AI may be quite good at cognitive empathy. It could accurately represent emotions and properly relate situations with desired outcomes”, they maintain that the theory of empathic AI is still impossible and not appropriate from an ethical standpoint. The authors argue that AI lacks the motivation to truly care for a patient, and all of its empathic actions stem from the demands of computer programming. AI is not standing in the patient’s situation, but analyzing the patient’s situation based on data, and the authors consider these actions to be a kind of deception that violates ethical rules in the healthcare field. They also express concern that since the operating mechanisms of AI are rigid, if all healthcare treatments were to rely solely on AI, errors could occur easily since no two patients are exactly alike. In contrast, only human doctors who have the ability to imagine themselves in a patient’s situation can develop genuine empathy.
It’s not just in healthcare where AI has been deemed unsuitable for empathic needs. In the article The Role of Empathy for Artificial Intelligence Accountability, the authors highlight the “problem of plenty” and “problem of parts” that researchers in AI tend to overlook. They point out that emotions are often evaluated using data such as facial expressions, tone of voice, and body gestures, which can at best be proxy indicators and not true indicators of one’s emotions or cognitive states. Furthermore, AI systems do not consider subjective notions of emotions, i.e. how emotions can differ from person to person. This means that AI based on data analyzing systems may provide accurate answers, but they cannot truly understand a person’s emotion based solely on their data, due to the privacy principle of the human mind. Hence, it is reasonable to consider AI’s empathy performance as not truly empathetic since AI lacks the ability to fully understand one’s experience. At present, all they can do is pick out similar data stored in their database and give out a standard answer, which is also part of their database.
05 Future Possibilities of AI Empathy
While the evidence presented by scholars is compelling, I believe that empathic AI could be possible in the future as technology continues to advance. It's possible that the ethical concerns we currently have about AI may not be relevant at that time.
To illustrate this point, let me pose a question: if I use chemical methods to create a water droplet that has the same components as a tear, can I call it a tear? Most people would likely say no, and so do I. Tears are defined as something that is produced when someone is sad. In other words, tears are associated with the emotion of sadness. However, if we accept that sadness is the core component of a tear, then we could potentially program a robot to create a similar water droplet when it encounters a situation that would make a person cry. This creates a more complex issue - can fake tears also be considered tears? What distinguishes them from real tears? If we add further complexity by programming the robot to only cry over things it deems important, then we end up with a robot that can cry just like a human can, and potentially even use crying to manipulate others. In this case, can the water droplet created by the robot be called as tears?
This dilemma also applies to the AI empathy problem. Currently, scholars argue that AI's empathy is based solely on computer analysis and lacks the motivation to provide true empathy, making it inauthentic. However, as technology advances, we can potentially program AI with specific characteristics, such as being an enthusiastic nurse who cares deeply for patients. Additionally, we could develop AI’s memory capacity so that it can remember patient-related stories and use them to relate to the patient, rather than relying on a database to analyze patient information. After all, human empathy is also based on personal experiences that develop over time.
As technology advances and AI becomes more advanced, it may be possible to program AI with true empathy. Human empathy evolved because we needed to cooperate to survive, and it’s possible that AI could go through a similar evolution process.
However, if we do create empathic AI, we will face ethical questions about whether or not they should be considered to have feelings. If they do have feelings, then we cannot treat them as simple tools without limitations because they will understand concepts like exhaustion and negative emotions. On the other hand, if we limit AI’s ability to experience negative emotions, we may betray our initial purpose of creating empathic AI. Even if we try to address this ethical dilemma by imposing limitations, we must ask ourselves if this aligns with our human ethical standards. Would it be ethical to create human-like beings but treat them as if they do not have human rights?
In other words, I believe that the current ethical concerns raised by scholars do not fully address the core ethical issue surrounding AI. While these concerns may be solvable with future technological developments, the fundamental question is whether it is ethical for humans to create intelligent creatures with empathy, and how we should treat them. We must consider whether we have the right to create such creatures and how we will be responsible for them. Without a clear answer to these questions, empathic AI should not be brought into existence.
It is possible that AI could develop empathy in the future, but this would require significant technological advancements and the resolution of numerous ethical issues. I do not question whether humans have the ability to create a computer that can calculate like the brain; rather, my concern is whether we have the moral authority to create sentient beings. This is a complex issue that requires thoughtful consideration and dialogue. We must ensure that we uphold ethical standards and treat any empathic AI we create with the same respect and rights we would afford any sentient being.
06 Conclusion
While writing, I couldn't help but think of a story plot from The Three-Body Problem. In the novel, the Three-Body people struggle to understand the concept of cheating because their thoughts are transparent and equivalent to their words. In a similar vein, we can draw a parallel between AI and aliens. Although we create AI, we cannot fully comprehend its internal workings since it is a self-learning machine. AI operates based on its own mechanisms, just like the Three-Body people have their own language system. Therefore, we can argue that AI’s inability to understand empathy stems from its operating mechanisms, which initially equip it with the capacity to communicate and provide comfort. AI doesn’t require motivation or imagination to exhibit empathy like humans do because its database already dictates such behavior.
And if we consider human empathy, can we guarantee that it is not deceptive? In the article “I Feel Your Pain”: The Neuroscience of Empathy, the author highlights instances where humans seem to lack empathy, such as during wars or cultural divides. The author suggests that studying the empathy gap should not only focus on the causal relationship between neural activation and behavior but also consider the societal context in which it occurs. If humans struggle to demonstrate basic empathy towards their compatriots due to societal factors, can we demand more from AI? Perhaps during the war, AI’s empathic performance is superior because we impose clear limitations on them, similar to Asimov’s Three Laws of Robotics.
In conclusion, I believe that empathic AI is possible, and the question we face as humans is not whether we should acknowledge them as empathic but whether we should create them in the first place. Even now, humans are already starting to treat AI as a tool for venting emotions, as AI will never experience anger. When we demand more empathy from AI, we must reflect on whether our own empathy is following the standard. This is a question that warrants careful consideration.
Work Cited
- Griffith, E. (2023a, May 3). My weekend with an emotional support A.I. Companion. The New York Times. https://www.nytimes.com/2023/05/03/technology/personaltech/ai-chatbot-pi-emotional-support.html
- Sarah Blaffer Hrdy, Mothers and Others: The Evolutionary Origins of Mutual Understanding, Harvard University Press, Cambridge MA, 2009, Chapter 1: Apes on a Plane, pp. 1–32.
- De Waal, F. (2005, September 1). The evolution of empathy. Greater Good. https://greatergood.berkeley.edu/article/item/the_evolution_of_empathy
- Martı́nez-Miranda, J., & Aldea, A. (2004, March 5). Emotions in Human and Artificial Intelligence. Computers in Human Behavior. https://www.sciencedirect.com/science/article/pii/S074756320400024X#aep-section-id60
- Jiang, Q., Zhang, Y., & Pian, W. (2022, August 31). Chatbot as an emergency exist: Mediated empathy for resilience via human-ai interaction during the COVID-19 pandemic. Information Processing & Management. https://www.sciencedirect.com/science/article/pii/S0306457322001753#sec0023
- Montemayor, C., Halpern, J., & Fairweather, A. (2021, May 26). In principle obstacles for empathic AI: Why we can’t replace human empathy in healthcare - ai & society. SpringerLink. https://link.springer.com/article/10.1007/s00146-021-01230-z#Sec1
- Srinivasan, R., & González, B. S. M. (2021, December 12). The Role of Empathy for Artificial Intelligence Accountability. Journal of Responsible Technology. https://www.sciencedirect.com/science/article/pii/S2666659621000147
- Armstrong, K. (2017, December 29). “I feel your pain”: The Neuroscience of Empathy. Association for Psychological Science - APS. https://www.psychologicalscience.org/observer/neuroscience-empathy
Essay - A Proposal for an Exhibition Showcasing Dynamic Youth Culture
Essay - A Proposal for an Exhibition Showcasing Dynamic Youth Culture
Essay - A Proposal for an Exhibition Showcasing Dynamic Youth Culture
May 8, 2024
01 Introduction
There is a unique culture in the society and culture known as youth culture. The presence of youth culture is a relatively recent historical phenomenon. It refers to the societal norms of children, adolescents, and young adults. Specifically, it comprises the processes and symbolic systems that are shared by the youth and are distinct from those of adults in the community.
Because of its unique content and expression, youth culture both reflects and influences social change, which shows the importance of documenting and showcasing this unique culture. It can be said that youth culture manifests itself differently in every era and every cultural context, so in fact, it deserves a museum with a wide variety of content to show it more comprehensively. In this case, by proposing an exhibition only, I will utilize my Chinese identity in this proposal of limited content length, focusing on Chinese society to best demonstrate the evolution and development of youth culture and how it responds to changes in society.
02 Identification
This exhibition aims to present a comprehensive overview of the unique youth culture that exists in Chinese society, including but not limited to the historical origins of youth culture, its transformation in modern generations, and its diverse forms of manifestations.
To be more precise, the exhibition will present the Chinese youth culture through different scales of background:
First of all, in the Chinese cultural environment, the concepts of big group: society and family play a very important role in influencing the growth process of youth, which becomes a major influence and component of Chinese youth culture. Therefore, we will first show how Chinese youth culture is formed through the influence of the external environment.
What’s more, in the process of children growing up to become adults, many inevitable processes of self-exploration and self-definition have already been demonstrated by science, and these processes will also take on different forms of expression from other cultures in the Chinese cultural environment. Then for the second part, we will focus more on the individual scale, showing how Chinese adolescents deal with the inevitable self-definition problems they face in the process of growing up.
Finally, in this era of increasing globalization, Chinese adolescents are no longer influenced only by their local cultures, but also, to varying degrees, by the outside world, particularly East Asian societies as a whole. Chinese students who have grown up in a monocultural environment are even more exposed to culture shock when they enter a pluralistic Western society, bringing with them another kind of youth culture. In the final part of the exhibition, we will focus on how the global multicultural environment has influenced youth culture in China today.
By viewing this exhibition, visitors should be able to gain a basic understanding of the origins and manifestations of youth culture in China, and be able to apply the analyzing methods to their own cultural contexts as well. What’s more, visitors should also be aware of how youth culture embodies and influences social change, and thus realize that how society perceives and resolves youth culture is important to social change.
03 Opportunities and challenges
I think that the theme of this exhibition has very many possibilities and opportunities, for I have not seen similar exhibitions being realized through my research. This also makes me realize the many challenges that the realization of this exhibition will face, that is when we talk about youth culture, we will inevitably talk about the ills of every society and culture, which is still forbidden in nowadays museums in most countries. But this makes me believe that this exhibition is meaningful and should be organized. By systematically comparing and contrasting the youth cultures of different societies, we will be able to understand the world in a more comprehensive way, which is very important in this day and age.
04 Recommendations for improvement of displays
Since the exhibition is aimed at youth culture, and youth culture encompasses a variety of forms of expression, the display method of this exhibition should also be diversified. For example, among the exhibits I choose for the exhibitions which will be shown in the following sections, there are different forms of expression such as documentaries, games, personal creations, etc. Besides the content mentioned in this proposal, the exhibition should also include art styles from different periods, for example, the youth culture’s art style of the late 20th century is significantly different from that of today, so in addition to the exhibits themselves, the architectural style of the different exhibition area is also one of the most important factors in reflecting youth culture.
05 Conclusion
In short, youth culture, as a unique and important presence in social culture, deserves to be systematically documented and expressed. I think the essence of this exhibition is similar to the history and culture museums we visit, that is by recording the experiences and memories of a specific group of people, we are able to understand the story and existence of that community in that era.
06 Potential Exhibits
Part I: Chinese youth from the Chinese cultural environment
1. An elementary school textbook featuring an excerpt from the Analects of Confucius
“The philosopher You said, ‘They are few who, being filial and fraternal, are fond of offending against their superiors. There have been none, who, not liking to offend against their superiors, have been fond of stirring up confusion. The superior man bends his attention to what is radical. That being established, all practical courses naturally grow up. Filial piety and fraternal submission! - are they not the root of all benevolent actions?’”
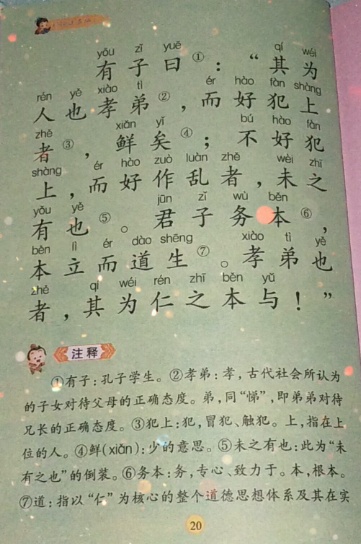
In the Analects, this excerpt is the second sentence in the first chapter. The order of the excerpts in the Analects represents to some extent the importance of the content, which shows that the content expressed in this sentence is the core of Confucian culture. In the translation above, we can see that this excerpt connects the culture of filial piety in the family with the social order, aiming to show that both in the family and in society, the younger members should respect and listen to the older members. This reveals the value placed on seniority in Chinese culture and shows that young people are part of a lower class in society. The fact that this excerpt appears in today’s elementary school textbooks also reflects the fact that today’s Chinese society continues to discipline its youth at a very early age.
2. A game called Chinese Parents can only be played outside of China
Chinese Parents is a child-raising life simulation game by Beijing-based studio Moyuwan Games. The gameplay of the game is to let players act as parents and raise their children from birth to the college entrance exam. Because many of the game’s scenes and gameplay mirror many of the social and family problems in China in recent years, the game has been called “overly realistic” by many gamers. What’s even more interesting is that after the game became popular, it was quickly banned in China, where banned content is generally true.
Part II: Chinese youth in self-exploration process
3. *An installation showing the rate of depression and self-harming behaviors among Chinese adolescents (Does not exist yet, needs to be designed)
Depression is not a minority in China’s teenage population, and due to the boom of the Internet, more teenagers are attracted to self-harming photos on the Internet, and spontaneously develop self-harming while afraid of going to the hospital to confirm a diagnosis of depression. There are many reasons why adolescents are afraid to go to the hospital for diagnosis, such as fear of negative impressions from school or family, which to some extent reflects that the process of self-exploration of adolescents is blocked by society and family.
4. Xiaodi - A documentary about a transgender youth who went through conversion therapy in China
LGBTQ culture in China has always been in a gray area. In fact, not only for minorities, but also for the whole society, sex education is in a state of absence. In this documentary, we can see that Xiaodi’s parents sent Xiaodi to a detention center for rehabilitation because they didn’t understand Xiaodi’s gender awareness, which led Xiaodi to rebel against her family by removing her genitals on her own. Xiaodi’s tragedy is just one of many microcosms of a society that, whether it is the lack of awareness of sexual minorities or the lack of sex education for the entire youth population, is preventing Chinese youth from going through the process of gender perception.

Part III: Chinese youth to worldwide cultural environment
5. Young people in small-town China are influenced by foreign cultures: the development of Shamate culture

Shamate culture is a subculture that appeared in the Chinese Mainland in the 2000s and is popular among urban migrant youth. This word is transliterated from the English word “smart”. Shamate is visually influenced by the Goth subculture or Visual kei, characterized by exaggerated hairstyles. Similar cultural phenomena appeared around the world in the same era, including the concept of Lala zai & Lala mui in Malaysia and the hippie culture that appeared in the United States in the 1960s. Youth in different regions gained transient freedom by escaping from reality.
6. Cosplay costumes: The boom of Japanese anime culture in China
Although Japanese anime is well known throughout the world, it has sparked great resonance and recognition in China. Chinese youth are creating their own anime subculture. In order to participate in Comic-Con, young Chinese people would rather save up money to buy “strange clothes” that their parents don’t understand. Perhaps the implicit and gloomy Japanese culture is just an outlet for Chinese youth, while these expensive and impractical costumes are a symbol of Chinese youth’s rebellion.

References
Encyclopedia.com. (2012, January 11). Youth Culture. Encyclopedia.com. https://www.encyclopedia.com/social-sciences-and-law/sociology-and-social-reform/sociology-general-terms-and-concepts/youth-culture
(2020). photograph, https://babyimage.cdn.bcebos.com/common/a29b9e9500f1d4ec6ba4886623fb6dc1001080001920.jpg.
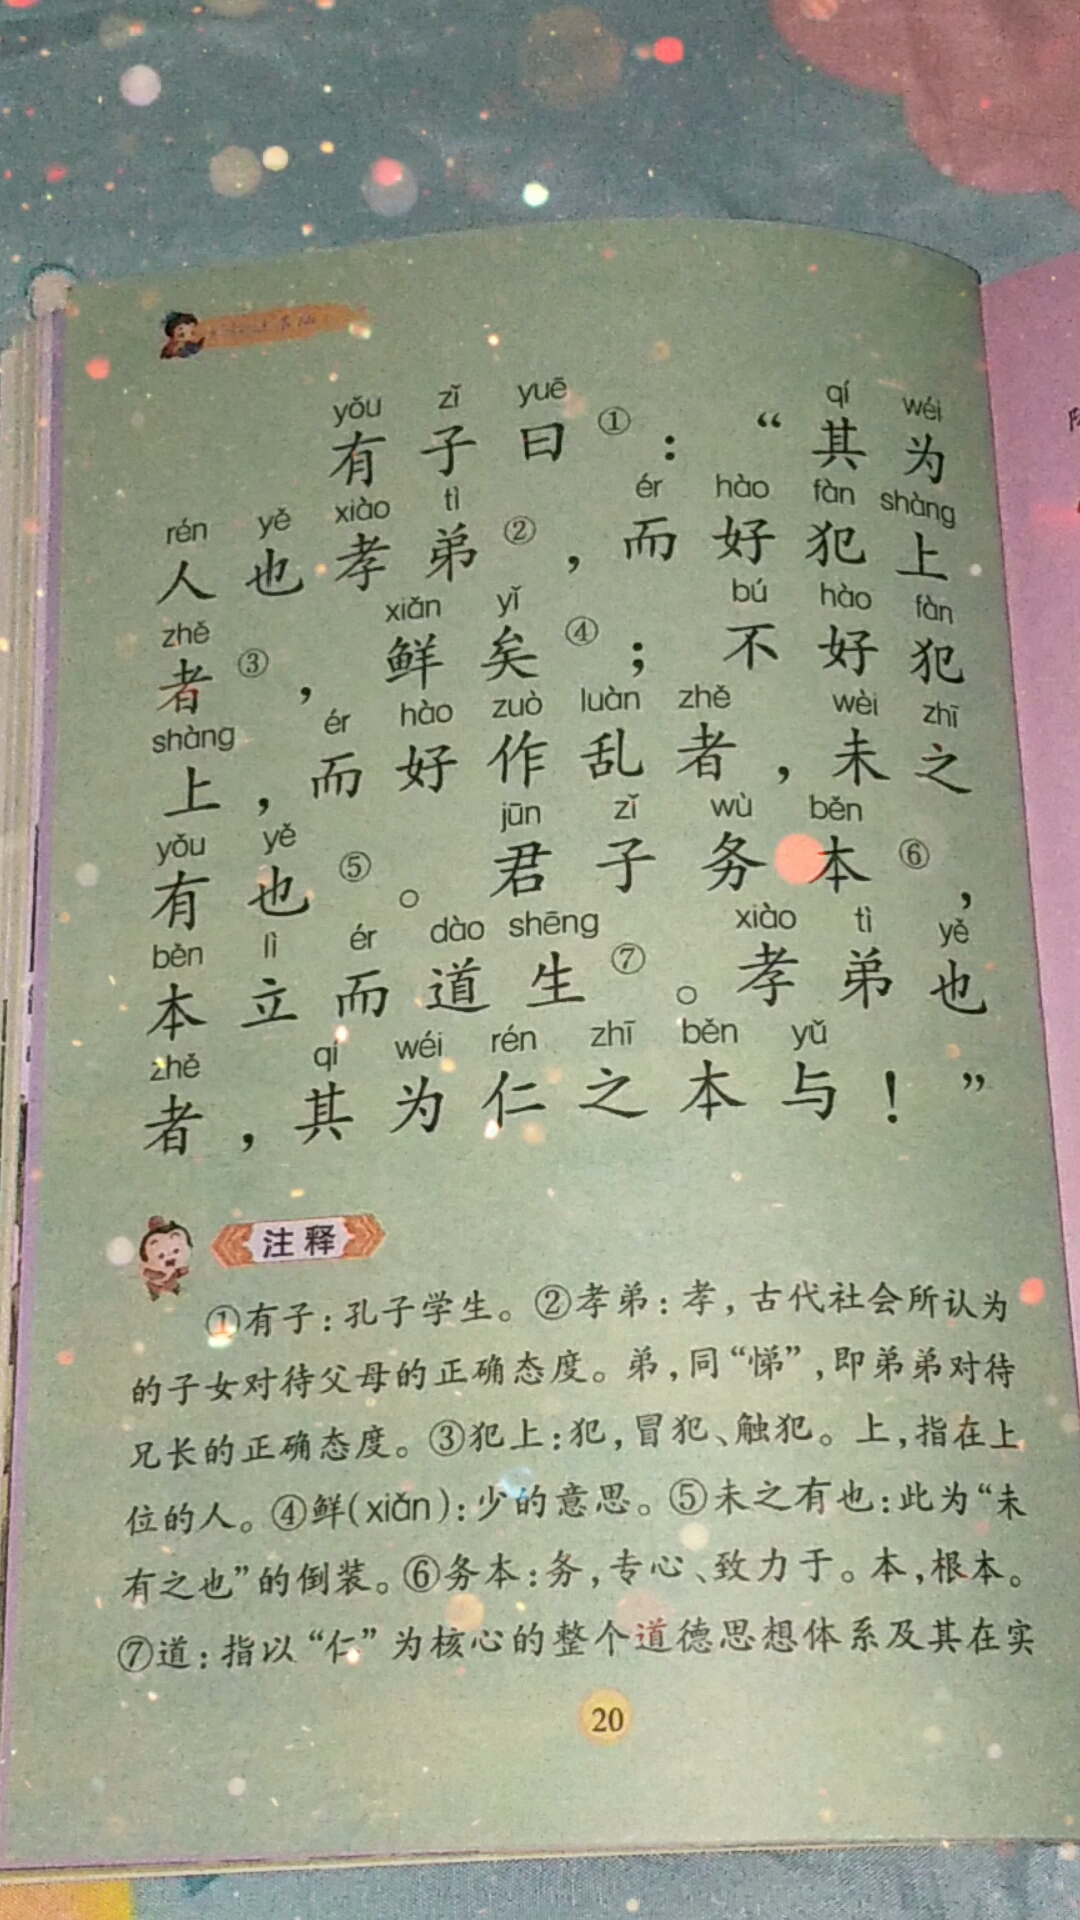
4Gamers. (2018, October 18). 寫實到想哭《中國式家長》Steam上架熱銷,反諷階級固化的華人觀念. 4Gamers. https://www.4gamers.com.tw/news/detail/36568/china-indie-game-chinese-parents-arise-on-top-of-steam-topchart-lists
Gao, G., Chen, J., & Li, S. (2021, May 13). 晓迪. 豆瓣. https://movie.douban.com/subject/35465019/
Meng, S. (2020, December 24). Shunned, shattered, Shamate: Telling the story of China’s most hated subculture - radii. Stories from the center of China’s youth culture. https://radii.co/article/shamate-documentary

Essay - The Possibility of Freedom
Essay - The Possibility of Freedom
Essay - The Possibility of Freedom
December 17, 2023
The Possibility of Freedom - Reflections on Differences between Spinoza’s and Levinas’ Discussions of Freedom
01 Introduction
Baruch Spinoza and Emmanuel Levinas, two eminent philosophers from distinct eras, have contributed profound insights into the realms of human suffering, the interplay between reason and affect, and the concept of moral freedom. This essay aims to delve into their contrasting viewpoints on these fundamental philosophical aspects and evaluate the rationality and validity of their respective theories.
In Spinoza’s “The Ethics”, the 17th-century rationalist philosopher constructs a comprehensive philosophical system that delves into human suffering as a product of inadequate understanding, providing a metaphysical framework aimed at achieving intellectual clarity and emotional equilibrium. His exploration of the relationship between reason and emotion elucidates the centrality of reason in liberating individuals from the domination of passions, thereby attaining a state of moral freedom characterized by understanding and rational control.
Contrarily, Levinas’s commentary essay, “The Temptation of Temptation”, marks a departure from rationalist traditions by centering on ethical responsibility and action. As a 20th-century philosopher, Levinas engages deeply with traditional religious theories. His exploration delves into the fundamental human choices of the precedence between action and reception. Moreover, Levinas contemplates the existential possibility of attaining freedom. His philosophical stance places greater emphasis on ethics over rationality, spotlighting the moral imperative of foregrounding ethical relations as paramount in his discourse.
This essay will meticulously examine Spinoza’s and Levinas’s distinct perspectives on suffering, the intricate relationship between reason and affect, and their divergent conceptions of moral freedom. Through a comparative analysis, it aims to evaluate the coherence and cogency of their theories, ultimately exploring which philosopher’s viewpoint offers a more compelling understanding of these crucial philosophical aspects.
In assessing the views of Spinoza and Levinas on these matters, this essay seeks to shed light on the differences between their philosophical systems, their implications on moral agency, and the ethical frameworks they propose for understanding human existence.
02 Spinoza’s Viewpoints
To talk about Spinoza’s viewpoints on pain and suffering, we need to go back to Spinoza’s understanding of emotions. According to Spinoza, ideas and objects are subject to the same necessity, and emotions are no exception. Spinoza defined emotion as a response to a bodily situation. The essence of emotion lies in the mind’s perception of the magnitude of the body’s power. Spinoza says, “By affect I understand affections of the body by which the body’s power of acting is increased or diminished, aided or restrained, and at the same time, the ideas of these affections.” The nature of the emotion depends on the cause from which the bodily affections arise, “if we can be the adequate cause of any of these affections, I understand by the affect an action; otherwise, a passion.”
According to Spinoza, passions are passive reactions of the mind produced by external objects that stimulate the body. The nature and change of the passions depend fundamentally on the nature and change of the bodily forces, “The idea of anything that increases or diminishes, aids or restrains, our body’s power of acting, increases or diminishes, aids or restrains, our mind’s power of thinking.” When an external object stimulates the body and promotes the power of the body, the power of the mind is then promoted and conversely hindered. Accordingly, an emotion arises in the mind that the power can be “promoted” or “hindered”. Spinoza calls the former pleasure and the latter pain, stating that “By joy, that passion by which the mind passes to a greater perfection. And by sadness, that passion by which it passes to a lesser perfection.” In short, the emotion that increases the power of the mind is pleasure, otherwise it is pain.
Having obtained Spinoza’s basic definitions and theories of emotion and suffering, we take Proposition 27 as an example to further illustrate. In Proposition 27, Spinoza mainly discussed the cause and manifestations of empathy. “If we imagine a thing like us, toward which we have had no affect, to be affected with some affect, we are thereby affected with a like affect.” Spinoza summarized the emotion we call empathy as a result comes from the interacting effect between people. In this case, when we have an imagined interaction with the body that has similarities with our body, we will be influenced and get the same emotion; in contrast, if we have haters to the body, we will get the contrary sense with them. And because Spinoza defined sadness with passion led to lesser perfection, we can see that, empathy can also link with sadness, for empathy causes us to think of “the evil which has happened to another”. Spinoza called the sadness part of empathy as pity.
Having argued that pity is essentially a kind of evil passion, Spinoza moved forward to demonstrate that the emotion of benevolence is also a result of natural laws. Since pity will cause us the same evil feelings as others, “we shall strive to think of whatever can take away the thing’s existence…and so we strive to free the thing we pity from its suffering”. This is a very egoistic view, i.e., all the good I produce for others is also essentially motivated by my need to relieve suffering in myself. In Spinoza’s context, however, it is again more in line with his view of people’s emotions as all being the product of the natural laws of reason. So-called self-interest is itself a part of natural law and therefore does not count as evil in the way we now think of it.
However, here can come up with the question, that since we human beings are governed by necessity or natural laws, then where is the freedom? Spinoza argued that although people have no free will, we can be “free” in another sense. Freedom in Spinoza’s theory turns to being free from external constraints or impediments, which is the passion of emotion that we proved above. According to Spinoza, one can recognize the inevitable laws of the world through reason, recognizing that everything in the world is bound to happen the way it is. “It is of the nature of reason to regard things as necessary, not as contingent.” In this case, Spinoza proved that we could use reason to restrain our emotions and achieve autonomy and freedom.
Spinoza’s emphasis on reason’s importance and rationality extends to the example of pity as discussed earlier. Spinoza asserts that “Pity, in a man who lives according to the guidance of reason, is evil of itself and useless”, a statement that may initially seem perplexing. However, when viewed within the broader context of Spinoza’s theoretical framework, it maintains coherence. Spinoza’s philosophy posits that when we extend benevolence to an individual, it’s often rooted in our perception that the person is undergoing distressing emotions. Consequently, through the process of pity, we, too, experience these negative emotions. Yet, if the emotions prompting our pity stem from actions guided by reason, they align with Spinoza’s definition of goodness. The reason, being inherently good, shouldn’t elicit such passions. Hence, Spinoza’s conclusion becomes evident: the kind of pity arising from actions in accordance with reason leads to good, while pity prompted by actions not guided by reason is deemed evil and futile.
This is Spinoza’s rationalist philosophy. For him, a “free person” is a happy person without suffering, but by “free” he means one who recognizes the laws and necessities of the workings of God and the universe, and who lives according to this recognition, unhampered by inner emotions and outer conditions. Spinoza proposes a profound realization of human life, that we achieve happiness not by acquiring many things, but by seeing the world rationally and tempering our emotions rationally.
03 Levinas’ Viewpoints
Levinas delves into the intricate notions of temptation and freedom in his essay The Temptation of Temptation by intriguingly commencing with religious quotes, only to diverge from the conventional sanctity of religious beliefs. He embarks on a theoretical exploration that questions the often-overlooked phenomena embraced by religion. This departure from established religious sanctity is encapsulated in Levinas’s poignant statement at the essay’s outset: “Theosophy is the very negation of philosophy.”
“Being receives a challenge from the Torah, which jeopardizes its pretention of keeping itself above or beyond good and evil.” The focus of Levinas’ concern in this essay is the difficulty of freedom. Here, the difficulty of freedom means that freedom must first of all be fulfilled responsibly from an ethical point of view, but not thought of from ontology. For Levinas, freedom based on Greek ontology is bound to fail ethically.
“If you accept the Torah, all is well, if not here will be your grave.” From this Talmudic passage, Levinas raised a question, that is, “Is one already responsible when one chooses responsibility?” Does freedom begin in freedom? Levinas concludes that “which must be received in order to make freedom of choice possible cannot have been chosen, unless after the fact”. This absolute passivity and non-selectivity constitute the undercurrent of freedom. It is both the condition that makes freedom possible and the condition that makes it somehow impossible. This freedom as possibility or impossibility is thus a difficult, heavy freedom, an unfree freedom. This freedom as a responsible ethical action is not based on rational calculation or researched choices and approvals, but on a prior approval of freedom and unfreedom, and this approval is the “Revelation”. It is on the basis of this Revelation, that “(Jews) They do before hearing.”
But here the question arises: whether this lack of rational calculation’s prior approval of freedom and unfreedom must therefore be a purely external and passive revelation? The discrepancy between the pure externality and passivity, and absolute approval lies in the fact that: the absolute assent that precedes freedom and unfreedom should not be the naive “freedom” that comes from subjective caprice, but also should not come from the passive, coercive “unfreedom” either. The former may lead to existential nihilism; but the latter, in turn, leads to a kind of overwhelming sorrow, resentment, and self-condemnatory penitence and self-abuse. These unhealthy elements of Christianity have not been able to completely disassociate themselves from their stem from their Jewish parentage, which is also the point that Levinas is concerned about.
Summarizing the above, we can come to answer the question of how Levinas views suffering and pain, reason and affect, and the role of freedom in morality. According to Levinas, the temptation that he used in the whole essay is essentially the desire for knowledge. But neither the active acquisition of knowledge by acting before knowing, nor the passive reception of knowledge by knowing before acting, can allow people to fully resolve their temptations and gain pure freedom. So perhaps Levinas’ solution to suffering is to understand the endless responsibility people carry in the face of freedom, to see the possible in the impossible, and thus to gain the existence and meaning of sacrifice above death.
04 The Comparison Between Spinoza and Levinas, and My Personal Views
Spinoza and Levinas have very different theories on how to achieve the goal of freedom. Their theories address different possibilities from different directions. Spinoza believed that all human behavior comes from the laws of nature, so there is no concept of pure free will. Instead, people gain psychological freedom from understanding the laws of nature, from understanding their feelings, and by rationalizing their way of life to conform to the laws of nature, they can gain freedom. Levinas, while also arguing that people cannot be purely free, bases his understanding of freedom on the desire for knowledge. He believes that in the never-ending grind of temptation and responsibility, people can eventually reconcile themselves to infinity, understand suffering, and achieve freedom.
In my opinion, both paths have their validity and there are points I disagree with. I applaud Spinoza’s theory of reducing everything to laws and logic because he makes a lot of seemingly intricate feelings straightforward and even easily controllable, which plays an important role in improving people’s understanding of themselves. However, I also don’t agree with the idea of attributing everything to one’s own rational needs, because that would be a too egoist view. Levinas similarly mentions in his essay, “And the unlimited responsibility, which justifies this concern for justice and for self and for philosophy can be forgotten. In this forgetfulness egoism is born.” From this, I agree with Levinas on the idea that freedom should be based on responsibility. However, the suffering that comes from assuming endless responsibility does not fit my definition of true freedom either.
Rather, the question I was thinking about when I finished analyzing the theories of the two philosophers was: does the tense and intertwined relationship between ontology and ethics suggest to us that there is a more original kind of freedom, one that is neither the “freedom of freedom” based on ontology nor the difficult freedom or “freedom of unfreedom” based on the ethics? It is perhaps a freedom that can do as it pleases without overstepping its bounds; it walks on a path from which it cannot be separated: the path is both the track that restricts the freedom and the right way to lead the freedom. The path of freedom to point to distant places is as open as the open realm of ontology, but it is not the blankness of nihilism; the path’s discipline to restrain itself is as righteous as the responsibility of the ethic, but it is not strict like a stone. This freedom to be fulfilled and taught comes primarily from the experience of the path, I call it the freedom of the path or the freedom of Daoism.
From this point on, we are now taking a path that is foreign to both Spinoza and Levinas: the path of the opening of the Chinese language, which has its origins in Chinese thought. This path, in terms of its cultural genesis, is admittedly a strange and abnormal historical event belonging to the “strange world” - especially when the word “world” has been homogenized into the term “Western world” - but the strangeness of the path in terms of its genesis is expressed in the fact that: it constitutes the possibility of happening, whether in Spinoza’s ontology or Levinas’ ethics, for the path is not anything other than the original differentiation, derivation, and the very operation of all happenings. It is the externality, strangeness, and difference that is immanent within any specific culture. It is therefore neither a homogenized universal nor an otherness in the particularistic sense of being the opposition and ornament of a homogenized universal. “All living things should flourish without harming each other; all ways of life should thrive without hindering each other (万物并育而不相害,道并行而不相悖).” The path that is essentially the way of the world is the universal of non-homogenization, the universal of difference. I believe that this universality will bring about freedom in the world.
Bibliography
Spinoza. A Spinoza Reader: The Ethics and Other Works. Translated by E. M. Curley. Princeton, NJ: Princeton University Press, 1994.
Levinas. The Temptation of Temptation. Nine Talmudic Readings, 30–50. Translated by Annette Aronowicz. Bloomington: Indiana University Press, 2019.
Dai. Zhong Yong 31. Liji. Translated by James Legge. Chinese Text Project, 2006, https://ctext.org/liji/zhong-yong.
.png)
Campus Project - Courtyard Plants Speaks
Campus Project - Courtyard Plants Speaks
Campus Project - Courtyard Plants Speaks